Monday, April 23, 2018

Setting Up Local Environment for Developing Oracle Intelligent Bots Custom Components

Oh the joy of having a local development environment is priceless. For most cloud based solutions the story repeats itself being hard to troubleshoot and make changes while developing your project.
Well, this is no different with Oracle Intelligent Bots and for your benefit setting up a local development environment is pretty simple to do.

Before you get started, make sure you have a Node.js downloaded and installed.

Download the OMCe Bots Samples v18.1.x from the Oracle Mobile Cloud Downloads page (http://www.oracle.com/technetwork/topics/cloud/downloads/mobile-suite-3636471.html) and extract the zip file on your machine.

There is no entry point to run this in a local environment so here is what you have to do.

Create a file called server.js with your favorite editor in the api_implementation directory you have extracted the zip file above and paste the following JavaScript code:

 const express = require('express');  
 const bodyParser = require('body-parser');  
 const components = require('./mcebots');  
 const app = express();  
 app.use(bodyParser.json());  
 components(app);  
 app.listen(process.env.PORT || 3000, () => {  
  console.log('Custom Components Server Ready');  
 });  


The piece of code above will wrap the Oracle Intelligent Bots custom component SDK functionality to run a simple Express.js implementation on top of Node.js using the port number you specify.
The way it does that is by requiring the mcebots.js as a dependency during the server startup.

To run it, use the following command:

 node server.js  

When you have your local server above running, try sending a HTTP GET to http://localhost:port/mobile/custom/bots_samples/components (you can use something like cURL, Postman or simply the browser).

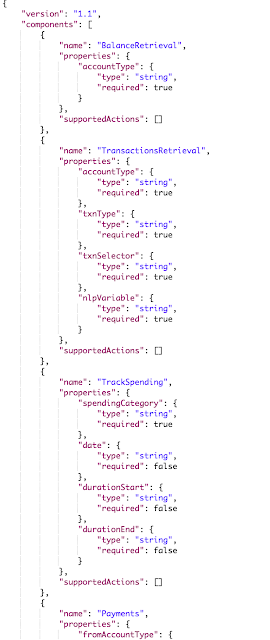
That call should return a list of sample components available to you and you should see something similar to the following payload:


You can start testing it or making changes to the registry and other functionality by editing the files
provided in the sample package. Please refer to the Oracle Mobile Cloud Enterprise documentation if needed (https://docs.oracle.com/en/cloud/paas/mobile-suite/develop/bot-components1.html#GUID-899EAAC9-2EF5-4C81-A836-F2CD4FA647DD).

Now, the next thing you should do is to enable your local server to be accessed by your Oracle Intelligent Bot and to do that I'd suggest that you use something like ngrok to create a public URL for exposing your local web server where the Bot Service will be able to reach your environment.

To make that happen, start a tunnel on your machine pointing to the port number you have ran your local server. In my case, I have started on port 3000 so I'd run ngrok like this:

 ./ngrok http 3000  

That would work for any free (un)registered account but if you have a ngrok subscription you can also setup a subdomain which helps quite a lot as you would not need to keep updating the server URL in the Bot Custom Component Service definition every time you restart your ngrok tunnel or it expires.

Anyway, ngrok will generate two tunnels for you (HTTP and HTTPS) so pick one to be used by your Custom Compoment definition.


Log in to your OMCe (Oracle Mobile Cloud Enterprise) instance, select Bots and choose the Bot you want to use. Go to the Components tab and click on the Add Service button.

Fill up all the required fields and remember that the Metadata URL should be your ngrok tunnel URL appended by /mobile/custom/bots_samples/components.

Click Create.

You should see a list of components created by expanding the recently service.


You are all set to develop your customer component locally with access from your Bot running on the Oracle Mobile Cloud Enterprise instance.

Tuesday, December 26, 2017

Using SMS Channels with Oracle Intelligent Bots


Using SMS is a very convenient way to communicate with someone these days and most people prefer to use SMS instead of email. SMS also gives you a history of the conversation while, for example, the context of a phone call can be easily forgotten if you don’t take notes.

In the same way that you text someone these days, you could also apply the same idea to business communications. The convenience, flexibility and speed of SMS can dramatically improve customer service. On top of that, several business tasks could be easily automated. Just imagine that you can get the status of something you order without waiting in line or having to download a particular mobile app by just texting the business’ phone number.

Having the capability of serving your users using SMS with an Intelligent Bot performing the interactions is the exact scenario we are going to explore in this article.

The Big Picture


To give you an overview of what we are going to put together here, you can start with the following diagram that illustrates the messaging flow and the major components involved.


  • You set up that Phone Number to send an HTTP request to your server every time a SMS message comes in.
  • Your server receives the messages from Twilio and prepare them to the Intelligent Bot server.
  • The Intelligent Bot server processes the request and sends an asynchronous HTTP response back to your server.
  • Your server receives that information and sends an HTTP request through the Twilio SMS API.
  • Twilio sends the SMS message to the user.

Setting up my Bot to Interact with SMS users


Once you already know what we are going to be doing, let’s have a look on what’s required before we get started and then dive into each one of these components.

Here are the ingredients:


The Twilio SMS Setup


The very first part of our scenario is to setup the Twilio Phone Number and SMS capabilities that users will send and receive SMS messages.

To do that, you’ll need to set up a Twilio account. You can sign up here: https://www.twilio.com/try-twilio.

Once you have a Twilio account, log into the Twilio Console (https://www.twilio.com/console) and buy a Twilio Phone Number with SMS enabled.


With your new Phone Number, you have completed the first part of our configuration and you should be able to send SMS messages to your number. The following diagram shows you what have you done so far.


The next thing you will need is a way for Twilio to send HTTP requests to your sample Node.js server. If the Node.js server is running on your machine and it’s not directly exposed to the Internet then Twilio won’t be able to reach it. To enable that, I’d recommend using ngrok (https://ngrok.com/) with multiple simultaneous tunnels which allows you to expose a local server to the Internet, in this case one endpoint to be used by Twilio and the other by the Intelligent Bot server. If you already have a server that’s exposed to the Internet then feel free to use it as we move along.

Make sure that your ngrok setup points to where you are going to be running your Node.js server.

The URL generated by ngrok or the URL of your own server is what we are going to use to set up the Webhook in the Twilio Phone Number under the Messaging section for when “A Message Comes In”.


So, every time that someone sends a SMS message to the number you have set up, Twilio will make an HTTP request to the Webhook URL you have provided above.

With that, you have completed the second part of our configuration and now Twilio is able to communicate with your server as showed in the below diagram.


The Intelligent Bot SMS Channel Setup


To use the Oracle Intelligent Bot with SMS you’ll need to set up the generic Webhook channel configuration.

To create a Webhook channel, go to your Bot Settings page, select Channels and click the ‘+ Channel’ to start configuring what you need.

Give it a name, description, select Webhook as the Channel Type, provide the Outgoing Webhook URI (this is where the Intelligent Bot server will make HTTP requests to your Node.js server) and make sure the Channel is set to Enabled.


After you click Create, the Intelligent Bot server generates a Webhook URL for your bot and its correspondent Secret Key for encrypting messages. Keep these two values handy because we are going to need them soon when we configure our Node.js server.


The Sample Node.js Server


Download and extract the sample Node.js server code from here. Make sure you have Node.js (https://nodejs.org/en/) downloaded and installed on your machine before continuing on this step.

The next step in our configuration is to have a piece of software that’s going to interface with both the SMS side (Twilio in this case) and the Oracle Intelligent Bot server. For this particular thing we are going to use a Node.js based server running some sample code to take care of those required tasks but you could host this on Oracle Mobile Cloud Enterprise (OMCe), Oracle Application Container Cloud Service (ACCS) or on your own server.

The sample Node.js server will receive the SMS messages from Twilio, extract the relevant information, sign the message according to the Intelligent Bot server expectations and send the messages to the Intelligent Bot server.

Then, the sample Node.js server will also receive messages back from the Intelligent Bot server, verify its signature, set up the response message and finally send the messages back to Twilio where the SMS will be generated and sent to the user.

But, before you run the sample Node.js server, you will need to provide some required metadata information. You can set this up as environment variables or straight into the source code if you want to.

These are the environment variables you’ll need:

  • TWILIO_ACCOUNT_SID – Your Twilio Account SID (You can get this from www.twilio.com/console)
  • TWILIO_AUTH_TOKEN – Your Twilio Auth Token (You can get this from www.twilio.com/console)
  • MY_TWILIO_NUMBER – This is the Twilio Phone Number you set up
  • BOT_SECRET_KEY – This is the Intelligent Bot SMS Channel Secret Key (You have this from the previous step) 
  • BOT_WEBHOOK_URL – This is the Intelligent Bot SMS Webhook URL (You have this from the previous step)

The sample Node.js server will look for those variables during the startup and you can export/set them depending on your host platform of choice.

Personally, since I'm on macOS, I prefer to use a .env file with the following information:

export TWILIO_ACCOUNT_SID=ACXXXXXXXXXXXXXXXXXXXXXXXXXXXXX
export TWILIO_AUTH_TOKEN=XXXXXXXXXXXXXXXXXXXXXXXXXXXXXXX
export BOT_SECRET_KEY= XXXXXXXXXXXXXXXXXXXXXXXXXXXXXXX
export BOT_WEBHOOK_URL=https://XXXXXXX.ngrok.io/connectors/v1/tenants/chatbot-tenant/listeners/webhook/channels/8C9F0AC4-FBBA-4BBE-8C4A-299D518396B8
export MY_TWILIO_NUMBER=+1555-555-5555

so I can keep all the required information in one place for my development needs.

Replace the instructions above based on your platform of choice and keep in mind that if you don’t set those values as environment variables then you’ll need to add that information in the twilio-sms/app.js file (approximately line 25) like showed below:


var metadata = {
        waitForMoreResponsesMs: 500,
        accountSid: ACXXXXXXXXXXXXXXXXXXXXXXX, // Your Twilio Account SID
        authToken: XXXXXXXXXXXXXXXXXXXXXXX, // Your Twilio authToken
        myTwilioNumber: ‘+1555-555-5555’, // Your Twilio Phone Number
        channelSecretKey: XXXXXXXXXXXXXXXXXXXXXXX, // BOT Secret Key
        channelUrl: XXXXXXXXXXXXXXXXXXXXXXX // BOT Webhook URL

    };

Now that you have set up all the required information for you Node.js server you can go ahead and start the server using the following command:

> node twilio-sms/index.js

With that, you have put together the final part of our configuration that allows the Intelligent Bot server communicate with your server.


Testing the SMS Channel with Intelligent Bots


To test the scenario that you just put together, you can send a SMS message to your Twilio Number and have a conversation with your Bot. If you have setup the sample Financial Bot then you can try asking your bot “what’s my balance?” or “send a payment” to see how the bot responds to your requests.


Conclusion


The fact that SMS is available everywhere, doesn’t require the user to download anything and it has a very low entry barrier makes it very appealing for a Bot channel.

With very little effort, you can set up everything needed for your Bot to be integrated with SMS API-based providers and have that channel available to your bot quickly.

Hopefully, this article provided a good idea on the major components, the necessary configuration on each level and the end to end functionality it provides to your bot project.

Setting Up Local Environment for Developing Oracle Intelligent Bots Custom Components

Oh the joy of having a local development environment is priceless. For most cloud based solutions the story repeats itself being hard to tr...