If you ever wanted to get rid of the 300ms delay between a physical tap and the the firing of a click event introduced on mobile browsers then the polyfill those guys from Financial Times created is the answer you are looking for.
Available on GitHub, FastClick is a simple, easy-to-use library for eliminating that delay and make your application feel more responsive to, for example, the touch of a button.
Have a look and fork the project at: https://github.com/ftlabs/fastclick
You can also give it a try running one of the demos on your mobile device pointing your browser to: http://ftlabs.github.com/fastclick/examples/layer.html (it won't work on your desktop browser as the library doesn't attach any listeners to them).
Fascinating and job well done...
Friday, December 28, 2012
Monday, November 12, 2012
Running iOS Simulator from Command Line
I've recently migrated to Mountain Lion and it looks like I couldn't start the iOS Simulator from command line as I used to do in Snow Leopard.
Luckily, I was able to find a solution and all development is back to normal now :)
Here is how to run the iOS Simulator from command line:
and that assumes that you have installed Xcode under /Applications.
You can also create a script with the content above and update your $PATH variable or even create a symbolic link under your /Applications folder using the following:
Luckily, I was able to find a solution and all development is back to normal now :)
Here is how to run the iOS Simulator from command line:
$ open /Applications/Xcode.app/Contents/Developer/Platforms/iPhoneSimulator.platform/Developer/Applications/iPhone\ Simulator.app
and that assumes that you have installed Xcode under /Applications.
You can also create a script with the content above and update your $PATH variable or even create a symbolic link under your /Applications folder using the following:
$ ln -s /Applications/Xcode.app/Contents/Developer/Platforms/iPhoneSimulator.platform/Developer/Applications/iPhone\ Simulator.app/ /Applications/
Monday, September 24, 2012
Time for another change...
Well, it's time for another career change... I've decided to take a slightly different direction and join TIBCO as Principal Consultant where I'm going to be involved with lots of architecture discussions, application design white boarding, development and deployment techniques, pre and post sales activities as well.
My story with TIBCO started a long time ago when I was primarily competing against the company on every single account I was working on. It definitely showed me how good the TIBCO technology is and how hard was to compete against a company that innovates a lot and definitely understands what customer are looking for.
Then moving over to a couple of smaller companies I could experience the partnership side from the EMS, Spotfire and Web Messaging perspectives which gave me a good way to start contributing from the first moment.
If you think about how the opportunities that have emerged from information silos to integration silos and consequently moving over to the new trends of mobile, social, cloud and other big things, TIBCO is definitely the company with the right technology to give you the right information at the right time and on the right hands to make a decision and give you the ability to compete on such tough markets these days.
And keep mind that having all the information related to a particular event six month after the fact is not more valuable that having a little bit of the right information just before it happens.
It can't be a more exciting time to join a company like TIBCO and I'm pretty sure the ride is going to be fun from Day 1.
Back to work...
Thursday, September 20, 2012
The mysterious behavior of Mac Mail and Yahoo! Mail Plus
If you, like me, uses Mac Mail as your primary email client and you also have an Yahoo! Mail Plus subscription (which gives you IMAP access to your Yahoo Mail account), you may have experienced an intermittent connection behavior where the email client is not able to connect due an invalid password even though you're using the correct one.
I've been reading lots of blog posts and forums reporting the exact same behavior and I was not able to find a concrete answer but the following approach seems to be working for me so far.
So, next time you see that dialog box requesting that you enter your password again to login to Yahoo, go to your web browser of choice and navigate to Yahoo Mail (mail.yahoo.com).
If you are automatically logged into the system then make sure you click on the Sign Out button first.
When you return to the login screen, type your username and password normally but make sure you select the Keep Me Signed In checkbox and then click Sign In. That should solve the problem.
Have fun...
Wednesday, August 8, 2012
An Introduction to STOMP
STOMP (Simple (or Streaming) Text-Oriented Messaging Protocol) is a simple text-oriented protocol, similar to HTTP.
STOMP provides an interoperable wire format that allows clients to communicate with almost every available message broker. STOMP is easy to implement and gives you flexibility since it is language-agnostic, meaning clients and brokers developed in different languages can send and receive messages to and from each other.
STOMP is an alternative to other open messaging protocols such as AMQP (Advanced Message Queueing Protocol) and implementation specific wire protocols used in JMS (Java Message Service) brokers such as OpenWire. It distinguishes itself by covering a small subset of commonly used messaging operations (commands) rather than providing a comprehensive messaging API.
STOMP provides an interoperable wire format that allows clients to communicate with almost every available message broker. STOMP is easy to implement and gives you flexibility since it is language-agnostic, meaning clients and brokers developed in different languages can send and receive messages to and from each other.
There are lots of server
implementations that support STOMP (mostly compliant with the STOMP 1.0
specification). The following is a list of STOMP 1.0 compliant message servers:
- Apache ActiveMQ – http://activemq.apache.org
- Apache Apollo – http://activemq.apache.org/apollo
- CoilMQ – http://code.google.com/p/coilmq
- HornetQ – http://www.jboss.com/hornetq
- MorbidQ – http://www.morbidq.com
- Sprinkle - http://www.thuswise.org/sprinkle/index.html
- StompServer - http://stompserver.rubyforge.org/
On the client side, there
are many implementations for a vast number of technologies. Below, you will
find the libraries available for the most popular languages.
Language
|
Libraries
|
C
|
libstomp - http://stomp.codehaus.org/C
|
C++
|
Apache CMS - http://activemq.apache.org/cms/
|
C# and .Net
|
Apache NMS - http://activemq.apache.org/nms/
|
Flash
|
as3-stomp - http://code.google.com/p/as3-stomp/
|
Java
|
|
Objective-C
|
objc-stomp - https://github.com/juretta/objc-stomp
|
Perl
|
Net::Stomp::Client - http://search.cpan.org/dist/Net-STOMP-Client/
Net::Stomp - http://search.cpan.org/dist/Net-Stomp/
|
PHP
|
|
Python
|
stomper - http://code.google.com/p/stomper/
stomp.py - http://code.google.com/p/stomppy/
|
Ruby on Rails
|
stomp gem - https://rubygems.org/gems/stomp
activemessaging - http://code.google.com/p/activemessaging/
|
STOMP is an alternative to other open messaging protocols such as AMQP (Advanced Message Queueing Protocol) and implementation specific wire protocols used in JMS (Java Message Service) brokers such as OpenWire. It distinguishes itself by covering a small subset of commonly used messaging operations (commands) rather than providing a comprehensive messaging API.
Because STOMP is language-agnostic and easy to implement,
it’s popular to application developers and technical architects alike. STOMP is
also text-based. Since it does not use binary protocols like other message
brokers, a wide range of client technologies work with STOMP, like Ruby,
Python, and Perl.
STOMP is simple to implement, but supports a wide range of
core enterprise messaging features, such as authentication, messaging models
(point to point and publish and subscribe), message acknowledgement,
transactions, message headers and properties, etc.
Monday, July 16, 2012
The Definitive Guide to HTML5 WebSocket
The book is on the way now! You can pre-order it here. It has been so much fun and a lot of work but I personally hope you can get a copy and enjoy all the content we're putting together.
Here is part of the book description if you want more information about it:
"The Definitive Guide to HTML5 WebSocket is the ultimate insider’s WebSocket resource. This revolutionary new web technology enables you to harness the power of true real-time connectivity and build responsive, modern web applications.
This book contains everything web developers and architects need to know about WebSocket. It discusses how WebSocket-based architectures provide a dramatic reduction in unnecessary network overhead and latency compared to older HTTP (Ajax) architectures, how to layer widely used protocols such as XMPP and STOMP on top of WebSocket, and how to secure WebSocket connections and deploy WebSocket-based applications to the enterprise. Build real-time web applications with HTML5."
The book gives you an overview of HTML5 WebSocket, the WebSocket API and the protocol, the high level protocols you can use on top of WebSocket, security aspects and enterprise deployment.
Saturday, July 14, 2012
The WebSocket bufferedAmount attribute
If you have been working or planning to work with HTML5 WebSocket you may end up transporting large amounts
of data and/or you may have the requirement to transport data as fast as possible.
The WebSocket object has an attribute called bufferedAmount that's particularly useful to check for the amount of data buffered
for transmission to the server. You can use the bufferedAmount attribute to check the number of bytes that have
been queued but not yet transmitted to the server.
The values reported in that attribute don’t include framing
overhead incurred by the protocol or buffering done by the operating system or
network hardware.
The code below shows an example of how to use the bufferedAmount
attribute to keep sending updates every second, if the network can handle
that rate, or at whatever rate the network can handle, if that is too fast.
// Buffering threshold at 10k
var THRESHOLD = 10240;
// Create a New WebSocket connection
var mySocket = new WebSocket(“ws://echo.websocket.org/updates”);
// Listen for the opening event
mySocket.onopen = function () {
setInterval(function() {
// Create a New WebSocket connection
var mySocket = new WebSocket(“ws://echo.websocket.org/updates”);
// Listen for the opening event
mySocket.onopen = function () {
setInterval(function() {
// Check for amount of data buffered but not sent yet
//and then send an update in case there is nothing //in the buffer
if (mySocket.bufferedAmount < THRESHOLD)
mySocket.send(getUpdateData());
}, 1000);
};
Using the bufferedAmount attribute can be useful
for throttling the rate at the applications send data to the server avoiding
network saturation.
Thursday, June 21, 2012
Checking for WebSocket Support on Your Web Browser
It’s frustrating to execute some code and don’t see anything happening after that. But, depending on the web browser you or the end user running your application is using that may be impacting the WebSocket functionality at this point since not all current browsers in use support HTML5 WebSocket natively yet.
So, let’s take a look on some techniques to make the web browser supports WebSocket.
We are going to use the JavaScript console available in all web browsers to start with the WebSocket support investigation. Each web browser has a different way to initiate the JavaScript console but if you’re using the suggested web browser (Google Chrome) take a look on the following resource to learn more about it (https://developers.google.com/chrome-developer-tools/docs/overview).
If you open your browser’s interactive JavaScript console and evaluate the expression window.WebSocket you should see the WebSocket constructor object:
function WebSocket() { [native code] }
which means that your web browser supports WebSocket natively.
The same test above in some other browsers comes back blank or undefined indicating no native support.
If you want to add that capability for WebSocket support to your application or on our sample client code, you can use the following approach.
By just adding the following conditional check to your code before you try the WebSocket connection then it would be enough to tell you if the web browser supports WebSocket natively.
if (window.WebSocket){
console.log("BROWSER SUPPORTED");
} else {
console.log("BROWSER NOT SUPPORTED");
}
If your target web browser doesn't support HTML5 WebSocket and you want to have that amazing capability on your application, it's time for you to look into some vendors like Kaazing where you have WebSocket emulation that enables any browser (modern or not) to support the HTML5 WebSocket standard APIs.
From the developers perspective they can work in a fully transparent environment, using the client libraries that enable them to simply code against standard WebSocket APIs. And from the end-user point of view, they interact with a WebSocket application that Kaazing’s WebSocket emulation technology kicks in when native WebSocket support is unavailable, giving the user a seamless experience.
There are several web sites available on the Internet to help you with compatibility, not only WebSocket, but also HTML5 features in general. To mention a couple of them, you can navigate to http://caniuse.com/ or http://html5please.com/ and check for the HTML5 feature you want to use on the target web browser manufacturer and/or version.
Saturday, June 9, 2012
The WebSocket readyState attribute
The WebSocket object will report the state of its connection through a read-only attribute called readyState.
There are four different values that the readyState attribute can receive to represent the state of the connection.
0 - CONNECTING – The connection has not been established yet.
1 - OPEN – The connection has been established and messages can be exchanged between the client and the server.
2 - CLOSING – The connection is going through the closing handshake.
3 - CLOSED – The connection has been closed or could not be opened.
When the WebSocket object is first created its readyState is 0, indicating that the socket is CONNECTING.
Thursday, May 10, 2012
Inspecting WebSocket Frames
So far, it has been a challenge for us working with HTML5 WebSocket to analyze the traffic going back and forth from the client to the server and from the server to the client. Without using packet sniffing tools like Wireshark or tcpdump the analysis and debugging of WebSocket messages is almost impossible.
But, recently, things are changing and it's now possible to see frame data along with arrows indicating the direction of the data is going to.
A WebKit patch has been created and you can use Chrome Canary to check the latest changes and start inspecting WebSocket frames. A huge advance for those working with HTML5 WebSocket.
There is also a step-by-step demo located here: http://blog.kaazing.com/2012/05/09/inspecting-websocket-traffic-with-chrome-developer-tools/
Monday, April 30, 2012
Accessing Databases with HTML5 WebSockets and Apache Camel
As I have said on my previous post, I've been working with several companies with the most diverse use cases and one that really brought my attention was the requirement to access databases using HTML5 WebSockets which seems to be a clever thing to do with the right tools.
So, basically what I've setup for this is represented on the picture below:

UDPATE:
Sample code is now available at: https://github.com/mjabali/DBOverWS
So, basically what I've setup for this is represented on the picture below:

Let's go over the implementation details of all of the components described here:
From right to left, the backend datasource I had to use was MySQL that you can download from http://www.mysql.com/downloads/. Then, I used Apache Camel as the backend framework accessing the database and also exposing a TCP-based component (Mina in this case). Moving to the left, we have the Kaazing WebSocket Gateway connecting to the Apache Camel framework and exposing WebSocket connectivity to the web clients (browser-based, mobile-based and desktop thick client applications).
The web-browser sample client is pretty straightforward and with a few lines of code you can get the functionality. There are sample javascript clients shipped with the Kaazing WebSocket Gateway that you can re-use or modify to your needs. The Kaazing WebSocket Gateway documentation set is also helpful and good starting point. Check it out: http://tech.kaazing.com/documentation/html5/3.3/o_dev_js.html
Then the only change you have to make in the Kaazing WebSocket Gateway is in the gateway-config.xml (under $KWG_HOME/conf) to include the service you want to expose to the web clients and where you want to connect to the backend framework with access to the database.
Here is what I have included on my configuration:
<!-- Demo JDBC Backend System Config -->
<!-- Proxy service -->
<service>
<accept>ws://${gateway.hostname}:${gateway.extras.port}/jdbc</accept>
<type>proxy</type>
<properties>
<connect>tcp://${gateway.hostname}:8888</connect>
</properties>
</service>
Check the Kaazing WebSocket Gateway documentation to get more familiar with these settings.
Last but not least, the Apache Camel route hosting the Mina endpoint and the database connectivity:
<camelContext xmlns="http://camel.apache.org/schema/spring">
<package>com.kaazing.gateway.demo.db</package>
<route id="WSMinaJDBCSample">
<from uri="mina:tcp://localhost:8888?timeout=30000"/>
<log message="RECEIVED: ${body}"/>
<setBody>
<simple>select * from customers where customers.email = '${body}'</simple>
</setBody>
<to uri="jdbc:myDataSource"/>
<log message="GENERATED: ${body}"/>
</route>
</camelContext>
<!-- MySQL datasource -->
<bean class="org.springframework.jdbc.datasource.DriverManagerDataSource" id="myDataSource">
<property name="driverClassName" value="com.mysql.jdbc.Driver"/>
<property name="url" value="jdbc:mysql://localhost:3306/test"/>
<property name="username" value="root"/>
<!-- <property name="password" value="XXXXX"/> -->
</bean>
The MySQL database setup is very simple and you can use any sample database tables you want. Just make sure you update the Apache Camel route and your environment settings accordingly.
Code will be available soon...
UDPATE:
Sample code is now available at: https://github.com/mjabali/DBOverWS
Tuesday, April 10, 2012
It's not lack of content...
We all have that excuse of no time for blogging or lack of interesting content for not updating our tech-y blogs but in fact there are tons of interesting things that I'm working on right now like a JDBC over WebSocket project which seems to be a really nice thing to do and also an end-to-end prototype that we at Kaazing put together for an airline company.
Basically, the airline use case goes from backend JMS-based systems to mobile devices over WebSocket using Kaazing WebSocket Gateway JMS Edition notifying the users about gate changes and flight cancellations. You gotta see this in action! It's super cool... Since it has some proprietary systems I won't be able to show you all parts but I've been working on a generic version of it where you can install all the pieces in your machine and run the whole thing locally. Ping me if you want to take a look on that.
The other project that I'm working on is the JDBC over WebSocket which basically uses Kaazing WebSocket Gateway HTML5 Edition to connect to an Apache Camel route with a Mina component and JDBC access to a MySQL database. Everything is pretty straightforward and I'll be writing a tutorial on that in the near future. But, if you need any additional info or sample code just let me know and I'll walk you thru whatever is needed to get you going...
Stay tuned!
Thursday, March 8, 2012
How to Setup RabbitMQ Message Broker with Kaazing WebSocket Gateway - AMQP Edition
If you want to try the Kaazing WebSocket Gateway - AMQP Edition with RabbitMQ, take a look on the following steps...
If you are trying this setup on a Mac, make sure you have Erlang already installed otherwise have a look on my previous post on How to Install Erlang on Mac OS X Snow Leopard.
Install RabbitMQ
- Download RabbitMQ from http://www.rabbitmq.com/download.html
- Extract the file to the desired directory
- Navigate to RabbitMQ installation directory and run the following command:
$ sbin/rabbitmq-server
If RabbitMQ is started correctly you should see a message similar to the following:
Install and Run Kaazing WebSocket Gateway - AMQP Edition
- Download and install Kaazing WebSocket Gateway - AMQP Edition
- Navigate to the Kaazing WebSocket Gateway installation directory and start it using the following command:
$ bin/gateway.start
Open your web browser of choice and navigate to http://localhost:8001 then select DEMOS on top menu.
At this point, you should be able to run any of the demos available using RabbitMQ as the backend messaging system.
If you are trying this setup on a Mac, make sure you have Erlang already installed otherwise have a look on my previous post on How to Install Erlang on Mac OS X Snow Leopard.
Install RabbitMQ
- Download RabbitMQ from http://www.rabbitmq.com/download.html
- Extract the file to the desired directory
- Navigate to RabbitMQ installation directory and run the following command:
$ sbin/rabbitmq-server
If RabbitMQ is started correctly you should see a message similar to the following:
Activating RabbitMQ plugins ...


********************************************************************************

********************************************************************************


0 plugins activated:


+---+   +---+

|   |   |   |

|   |   |   |

|   |   |   |

|   +---+   +-------+

|                   |

| RabbitMQ  +---+   |

|           |   |   |

|   v2.7.1  +---+   |

|                   |

+-------------------+

AMQP 0-9-1 / 0-9 / 0-8

Copyright (C) 2007-2011 VMware, Inc.

Licensed under the MPL.  See http://www.rabbitmq.com/


node           : rabbit@yoda

app descriptor : /Applications/Kaazing/kaazing-websocket-gateway-amqp-3.2.0/rabbitmq_server-2.7.1/sbin/../ebin/rabbit.app

home dir       : /Users/Marcelo

config file(s) : (none)

cookie hash    : AYkkciNJ6lsr2dyADBN8ww==

log            : /Applications/Kaazing/kaazing-websocket-gateway-amqp-3.2.0/rabbitmq_server-2.7.1/work/rabbitmq/rabbit@yoda.log

sasl log       : /Applications/Kaazing/kaazing-websocket-gateway-amqp-3.2.0/rabbitmq_server-2.7.1/work/rabbitmq/rabbit@yoda-sasl.log

database dir   : /Applications/Kaazing/kaazing-websocket-gateway-amqp-3.2.0/rabbitmq_server-2.7.1/work/rabbitmq/mnesia/rabbit@yoda

erlang version : 5.9


-- rabbit boot start

starting file handle cache server                     ...done

starting worker pool                                  ...done

starting database                                     ...done

starting codec correctness check                      ...done

-- external infrastructure ready

starting plugin registry                              ...done

starting auth mechanism cr-demo                       ...done

starting auth mechanism amqplain                      ...done

starting auth mechanism plain                         ...done

starting statistics event manage                      ...done

starting logging server                               ...done

starting exchange type direct                         ...done

starting exchange type fanout                         ...done

starting exchange type headers                        ...done

starting exchange type topic                          ...done

-- kernel ready

starting alarm handler                                ...done

starting node monitor                                 ...done

starting cluster delegate                             ...done

starting guid generator                               ...done

starting memory monitor                               ...done

-- core initialized

starting empty DB check                               ...done

starting exchange, queue and binding recovery         ...done

starting mirror queue slave sup                       ...done

starting adding mirrors to queues                     ...done

-- message delivery logic ready

starting error log relay                              ...done

starting networking                                   ...done

starting direct_client                                ...done

starting notify cluster nodes                         ...done


broker running
Install and Run Kaazing WebSocket Gateway - AMQP Edition
- Download and install Kaazing WebSocket Gateway - AMQP Edition
- Navigate to the Kaazing WebSocket Gateway installation directory and start it using the following command:
$ bin/gateway.start
Open your web browser of choice and navigate to http://localhost:8001 then select DEMOS on top menu.
At this point, you should be able to run any of the demos available using RabbitMQ as the backend messaging system.
Monday, March 5, 2012
Installing Erlang on Mac OS X Snow Leopard
I'm working with a customer who is using the Kaazing WebSocket Gateway - AMQP Edition with RabbitMQ and while his install was pretty straightforward on Windows 7 I thought the same would be applicable to my case (a Mac user). Well, to summarize the process, it was quite of a challenge to get everything working, not from the complexity perspective but for the number of steps involved in the process to get the environment running starting from the point that RabbitMQ depends on Erlang to run. So, that was the first step... Installing Erlang on Mac OS X
Here are the steps I had to take:
- Download and install Apple Xcode 4.3 from Apple's AppStore (yeah, you read it right!)
- The tricky part here was to enable Command Line Tools which is not selected by default in Xcode. To do that, go to Xcode Preferences --> Downloads --> Components and install Command Line Tools. It's just another 170MB over the already downloaded 1.35GB of Xcode :)

- Download Erlang latest release from http://www.erlang.org/download.html
- Extract the Erlang package (i.e. tar -xvf otp_src_R15B.tar) and navigate into the recently created directory
- Run ./configure
- Run ./make
- Run sudo make install
Hope this help you to get your project going...
Monday, February 27, 2012
Quick Start with the Kaazing WebSocket Gateway in Less Than 6 Minutes
One of my colleagues at Kaazing just recorded a very nice tutorial on how to get started with the Kaazing WebSocket Gateway using the extreme powerful JMS Edition.
It only takes a few minutes to download, install, start up, and try out the Kaazing WebSocket Gateway. So, it's really worth it...
You can take a peek here: http://vimeo.com/36919680
Enjoy...
Moving On...
Well, it has been a while since I updated this blog and there are many reasons just to say that I wasn't motivated enough to write anything lately. Some personal issues as well as another job change associated with a short vacation contributed to the delay but the good part is that I'm back and really happy with how the year is shaping up.
It seems to be that all personal stuff is sorted out and I also have decided to join Kaazing as a Solutions Architect. Kaazing is the first Enterprise-grade Web Communications Platform leveraging HTML5 WebSockets designed for real-time, massive scalability and providing reliability necessary for companies to deploy those kind of solutions over the web.
If you're not familiar with HTML5 and WebSockets and I'd recommend you to take a look on the following presentation available at http://www.infoq.com/presentations/WebSockets-The-Web-Communication-Revolution.
Stay tuned for more...
Subscribe to:
Posts (Atom)
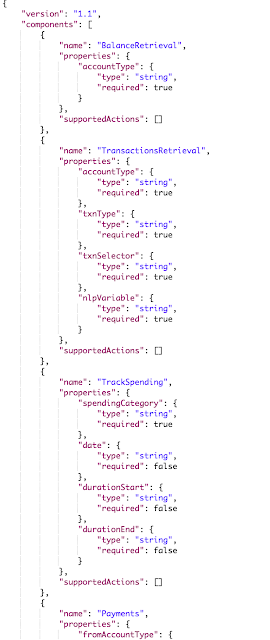
Setting Up Local Environment for Developing Oracle Intelligent Bots Custom Components
Oh the joy of having a local development environment is priceless. For most cloud based solutions the story repeats itself being hard to tr...
-
 There are some use cases and business scenarios where you have to process messages in order. Basically, when multiple consumers receive mes...
 -
 Apache ActiveMQ / FUSE Message Broker has a feature called Virtual Destinations that are logical destinations (queues or topics) mapped t...
 -
 Web Services are very important components of most (if not all) of the integration projects these days. The Web Services architecture make t...