Well, that's where the Apache Camel MINA component comes really handy and you don't need to reinvent the wheel.
Camel MINA is a transport component working with Apache MINA which is a network application framework that provides event-driven asynchronous API over various transports such as TCP/IP and UDP.
A very common use case is to deploy camel-mina as a proxy in a Camel route and then do whatever is needed with the data like converting it to the appropriate format for example.
To give you an example, here is something you can do easily to test how camel-mina can help you:
Using the FUSE IDE create a new FUSE Project and then open the default camel-context.xml file under $PROJECT_HOME/src/main/resources/META-INF/spring if it's not open for you.
You can simply remove the default route created in the project and start with a new one.
Add a new Route. Right-click on the canvas and then select Add --> Route.
Then, add a new Endpoint, Right-click on the canvas and then select Add --> Endpoints --> Endpoint.
Go to the Properties panel and add the following to the Uri field:
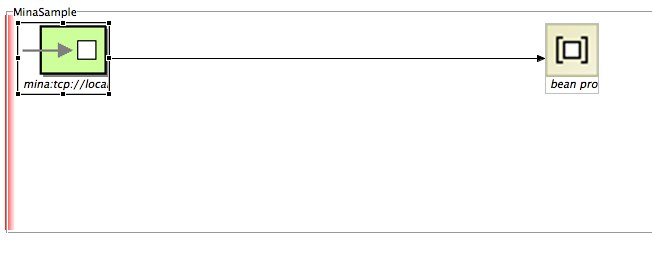
mina:tcp://localhost:8888?textline=true&sync=true
Here is a screenshot of the configuration in the FUSE IDE:

In this example, we're creating a MINA consumer endpoint that listens on port 8888, using the textline codec and sync means that we'll be using a synchronous exchange where the client can read a response from the MINA component.
To add a little more fun to this sample, you can add a simple bean to, for example, convert the payload to upper case. Really simple stuff but you get the idea as that step could be dropping that message into an ActiveMQ queue, executing another Camel component, etc.
So, here is a simple Java class to do that:
public class MyTcpMsgHandler {
public String myTcpMsgHandler(String msg){
return msg.toUpperCase();
}
}
Last development step is going to be adding the new Java bean into the route. To do that, right-click on the canvas and go to Add --> Endpoints --> Bean. Go to the Properties panel and then configure your recently create bean. Here is a sample configuration:

That's it! All the steps necessary to create your Camel route using camel-mina are there!
Here is a screenshot of what we just did with the complete route:
So, if you want to test that route (there are many ways to do that) you'll need a client to connect to that endpoint exposed by our route.
Here is a very simple client to test it:
package com.fusesource.fusebyexample;
import java.io.*;
import java.net.*;
class TCPClient{
public static void main(String argv[]) throws Exception{
String sentence = null;
String modifiedSentence;
boolean clientUp = true;
BufferedReader inFromUser = new BufferedReader( new InputStreamReader(System.in));
Socket clientSocket = new Socket("localhost", 8888);
DataOutputStream outToServer = new DataOutputStream(clientSocket.getOutputStream());
BufferedReader inFromServer = new BufferedReader(new InputStreamReader(clientSocket.getInputStream()));
while(clientUp = true){
sentence = inFromUser.readLine();
outToServer.writeBytes(sentence + '\n');
modifiedSentence = inFromServer.readLine();
System.out.println("FROM SERVER: " + modifiedSentence);
if(modifiedSentence.equals("STOP")){
clientSocket.close();
System.out.println("Stopping TCP Client...");
System.exit(0);
}
}
}
}
Don't forget to include camel-mina dependency in your POM file before you deploy your Camel route.
Next, let's test our route. Right-click on your camel-context.xml file and then select Run As... --> Local Camel Context. Watch the FUSE IDE console for any issues being reported or for a successful deployment. You can also run the Camel route manually by executing the following command:
$ mvn camel:run
Also, run the sample client which opens a prompt for you to type a message. Type for example "apache camel rocks!" and you should see a reply back like this: FROM SERVER: APACHE CAMEL ROCKS! as the result of our processing of the message by our bean.
This sample demonstration code is also available on GitHub: https://github.com/mjabali/MinaSample
Enjoy the ride!