Showing posts with label java. Show all posts

Wednesday, October 21, 2015

Developing against Oracle Mobile Cloud Service (MCS) with Oracle Enterprise Pack for Eclipse (OEPE) and the Mobile Application Framework (MAF)

If you want to get started developing against the Oracle Mobile Cloud Service (MCS) using the Oracle Enterprise Pack for Eclipse (OEPE) and the Mobile Application Framework (MAF) here is a quick demonstration for you to get a feel and see how quick you can get things done.

In the following 5 min. demonstration you'll see how to setup a new MAF application, connect to the Oracle Cloud from Eclipse, search for the mobile backend you're interested on, import the API definition to your app, generate the required data controls, populate a new page with data and deploy to the Android emulator.

Have fun!


Monday, January 19, 2015

Oracle Mobile Application Framework Getting Started Demo

Sometimes you just need a little push to get started on something and this is pretty much the goal of this post... to get you started with the Oracle Mobile Application Framework.

I'm a very visual person and no matter how much I read about a specific topic I prefer watching a demo or a tutorial and then I try to do something on my own.

With that idea in mind I recorded a 3-part Oracle MAF demo that covers how to get started developing a mobile app, create a new feature (module), create and customize a task flow, invoke a REST Web Service as well as a SOAP Web Service, customize the request and response for the Web Service calls, create a data control, customize the MAF AMX pages, import a local HTML resource, configure a Remote URL based feature and deploy to the iOS Simulator.

I hope you enjoy!


Part 1: Getting Started with Oracle Mobile Application Framework

Part 2: Getting Started with Oracle Mobile Application Framework

Part 3: Getting Started with Oracle Mobile Application Framework


Wednesday, February 5, 2014

Getting Started with HTML5 WebSocket on Oracle WebLogic 12c

The current release of Oracle WebLogic (12.1.2) added support to HTML5 WebSocket (RFC-6455) providing the bi-directional communication over a single TCP connection between clients and servers. Unlike the HTTP communication model, client and server can send and receive data independently from each other. 

The use of WebSocket is becoming very popular for highly interactive web applications that depend on time critical data delivery, requirements for true bi-directional data flow and higher throughput.
To initiate the WebSocket connection, the client sends a handshake request to the server. The connection is established if the handshake request passes validation, and the server accepts the request. When a WebSocket connection is established, a browser client can send data to a WebLogic Server instance while simultaneously receiving data from that server instance. 

The WebLogic server implementation has the following components:
  •  The WebSocket protocol implementation that handles connection upgrades and establishes and manages connections as well as exchanges with the client. The WebLogic server fully implements the WebSocket protocol using its existing threading and networking infrastructure.
  • The WebLogic WebSocket Java API, through the weblogic.websocket package, allows you to create WebSocket-based server side applications handling client connections, WebSocket messages, providing context information for a particular WebSocket connection and managing the request/response handshake. For additional information about the WebLogic WebSocket Java API interfaces and classes, visit the following resource: http://docs.oracle.com/middleware/1212/wls/WLPRG/websockets.htm#BABJEFFD
  • To declare a WebSocket endpoint you use the @WebSocket annotation that allow you to mark a class as a WebSocket listener that's ready to be exposed and handle events. The annotated class must implement the WebSocketListener interface or extend from the WebSocketAdapter class.
When you deploy the WebSocket-based application on WebLogic, you basically follow the same approach using the standard Java EE Web Application archives (WARs), either as standalone or WAR module. Either way, the WebLogic Application Server detects the @WebSocket annotation on the class and automatically establishes it as a WebSocket endpoint.

Here is a simple application that creates a WebSocket endpoint at the /echo/ location path, receives messages from the client and sends the same message back to the client.

import weblogic.websocket.WebSocketAdapter;
import weblogic.websocket.WebSocketConnection;
import weblogic.websocket.annotation.WebSocket;

@WebSocket(pathPatterns={"/echo/*"})
public class Echo extends WebSocketAdapter{

@Override
  public void onMessage(WebSocketConnection connection, String msg){
      try{
          connection.send(msg);
      }catch(IOException ioe){
          //Handle error condition
      }
  }

}

On the client side, you typically use the WebSocket JavaScript API that most of the web browsers already support.


There are many samples out there that you can use to test the implementation above. One quick way of doing that is to navigate to http://www.websocket.org/echo.html and then point the location field to your WebLogic server. If you follow the sample available on https://github.com/mjabali/HelloWorld_WebSocket then you'll end up with something like ws://localhost:7001/HelloWorld_WebSocket/echo/ for the WebSocket server application.

The sample client provided will be available at http://localhost:7001/HelloWorld_WebSocket/index.html after the WebLogic deployment. See the README.md file on GitHub for additional instructions.

Have fun!

Wednesday, August 8, 2012

An Introduction to STOMP

STOMP (Simple (or Streaming) Text-Oriented Messaging Protocol) is a simple text-oriented protocol, similar to HTTP.

STOMP provides an interoperable wire format that allows clients to communicate with almost every available message broker. STOMP is easy to implement and gives you flexibility since it is language-agnostic, meaning clients and brokers developed in different languages can send and receive messages to and from each other. 

There are lots of server implementations that support STOMP (mostly compliant with the STOMP 1.0 specification). The following is a list of STOMP 1.0 compliant message servers:


On the client side, there are many implementations for a vast number of technologies. Below, you will find the libraries available for the most popular languages.


STOMP is an alternative to other open messaging protocols such as AMQP (Advanced Message Queueing Protocol) and implementation specific wire protocols used in JMS (Java Message Service) brokers such as OpenWire. It distinguishes itself by covering a small subset of commonly used messaging operations (commands) rather than providing a comprehensive messaging API. 

Because STOMP is language-agnostic and easy to implement, it’s popular to application developers and technical architects alike. STOMP is also text-based. Since it does not use binary protocols like other message brokers, a wide range of client technologies work with STOMP, like Ruby, Python, and Perl.

STOMP is simple to implement, but supports a wide range of core enterprise messaging features, such as authentication, messaging models (point to point and publish and subscribe), message acknowledgement, transactions, message headers and properties, etc.


Monday, April 30, 2012

Accessing Databases with HTML5 WebSockets and Apache Camel

As I have said on my previous post, I've been working with several companies with the most diverse use cases and one that really brought my attention was the requirement to access databases using HTML5 WebSockets which seems to be a clever thing to do with the right tools.

So, basically what I've setup for this is represented on the picture below:


Let's go over the implementation details of all of the components described here:

From right to left, the backend datasource I had to use was MySQL that you can download from http://www.mysql.com/downloads/. Then, I used Apache Camel as the backend framework accessing the database and also exposing a TCP-based component (Mina in this case). Moving to the left, we have the Kaazing WebSocket Gateway connecting to the Apache Camel framework and exposing WebSocket connectivity to the web clients (browser-based, mobile-based and desktop thick client applications).

The web-browser sample client is pretty straightforward and with a few lines of code you can get the functionality. There are sample javascript clients shipped with the Kaazing WebSocket Gateway that you can re-use or modify to your needs. The Kaazing WebSocket Gateway documentation set is also helpful and good starting point. Check it out: http://tech.kaazing.com/documentation/html5/3.3/o_dev_js.html

Then the only change you have to make in the Kaazing WebSocket Gateway is in the gateway-config.xml (under $KWG_HOME/conf) to include the service you want to expose to the web clients and where you want to connect to the backend framework with access to the database.

Here is what I have included on my configuration:

<!-- Demo JDBC Backend System Config -->
  <!-- Proxy service --> 
  <service>
<accept>ws://${gateway.hostname}:${gateway.extras.port}/jdbc</accept> 
<type>proxy</type>
<properties>
<connect>tcp://${gateway.hostname}:8888</connect>
</properties>
   </service>

Check the Kaazing WebSocket Gateway documentation to get more familiar with these settings.

Last but not least, the Apache Camel route hosting the Mina endpoint and the database connectivity:

 <camelContext xmlns="http://camel.apache.org/schema/spring">
    <package>com.kaazing.gateway.demo.db</package>
    <route id="WSMinaJDBCSample">
        <from uri="mina:tcp://localhost:8888?timeout=30000"/>
        <log message="RECEIVED: ${body}"/>
        <setBody>
        <simple>select * from customers where customers.email = '${body}'</simple>
        </setBody>
        <to uri="jdbc:myDataSource"/>
        <log message="GENERATED: ${body}"/>
    </route>
</camelContext>


<!-- MySQL datasource -->
  <bean class="org.springframework.jdbc.datasource.DriverManagerDataSource" id="myDataSource">
    <property name="driverClassName" value="com.mysql.jdbc.Driver"/>
    <property name="url" value="jdbc:mysql://localhost:3306/test"/>
    <property name="username" value="root"/>
    <!-- <property name="password" value="XXXXX"/>  -->
  </bean>


The MySQL database setup is very simple and you can use any sample database tables you want. Just make sure you update the Apache Camel route and your environment settings accordingly.

Code will be available soon...

UDPATE:
Sample code is now available at: https://github.com/mjabali/DBOverWS

Tuesday, December 27, 2011

Getting Started with Apache Camel (Video)

In this video demonstration, published on the FuseSource YouTube channel, you're going to see how to get started with Apache Camel (FUSE Mediation Router) on a real world scenario working with a Composed Enterprise Integration Pattern (FUSE EIP).

The video demonstration talks about a Book Shop example application that receives a message from a JMS source, in this case Apache ActiveMQ / FUSE Message Broker and then split the message according to number of orders available in the message, then based on the content the message is going to be routed to different web services endpoints (provided by Apache CXF / FUSE Services Framework), after that the requests to the web services are then aggregated through the Apache Camel aggregator component and finally the resulting message is sent to a response JMS queue.


Enjoy the ride...

Wednesday, November 30, 2011

Virtual and Composite Destinations with Apache ActiveMQ

Apache ActiveMQ / FUSE Message Broker has a feature called Virtual Destinations that are logical destinations (queues or topics) mapped to one or more physical destinations.

There are many benefits for using Virtual Destinations with ActiveMQ but basically you can forward messages from one JMS destination to many destinations (mixing queues and topics if you want), route messages to target destinations based on message headers (a.k.a broker-based message routing) and create highly-available load-balanced durable subscribers.


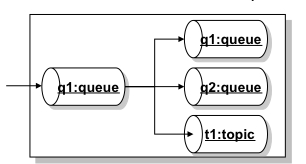
As an example, looking in the diagram above, you can have a Virtual Destination called q1, where applications will send messages to as they do to any other regular queue, and then the message will get propagated to a real physical queue called q1, to a real queue physical queue called Q2 and also to a topic called T1.

The example above is called Composite Destinations and the idea behind it is to map a Virtual Destinations to a hard-wired collection of physical destinations. From the JMS client application perspective there is nothing you'll need to change since all the configuration happens at the broker level.

So, let's look on what need to be done to work with Virtual and Composite Destinations with ActiveMQ.


The diagram above represents the idea of having producer P sending messages to a queue called CompositeQueue.q (it doesn't have to be called that way).
That queue is rooting messages to a topic called Topic.a and a queue called Queue.b.

All of the required configuration is done in the ActiveMQ XML configuration file. Below, there is snippet of the broker configuration file where the above example is configured.


<broker ...>
    <destinationInterceptors>
      <virtualDestinationInterceptor>
        <virtualDestinations>
          <compositeQueue name=“CompositeQueue.q">
            <forwardTo>
               <topic physicalName=“Topic.a" />
               <queue physicalName=“Queue.b" />
            </forwardTo>
          </compositeQueue>
        </virtualDestinations>
      </virtualDestinationInterceptor>
    </destinationInterceptors>
  </broker>

The interesting thing here is that you can mix queues and topics without making any changes in the client code and this is not part of the JMS specification.

You can also extend that to use composite topics pretty much on the same way… Below you'll find a similar broker configuration to use Virtual Topics:


<broker ...>
    <destinationInterceptors>
      <virtualDestinationInterceptor>
        <virtualDestinations>
          <compositeTopic name="VirtualTopic.A">
    <forwardTo>
           <queue physicalName="FOO" />
           <topic physicalName="BAR" />
    </forwardTo>
          </compositeTopic>
        </virtualDestinations>
      </virtualDestinationInterceptor>
    </destinationInterceptors>
  </broker>

So, with a simple change in the ActiveMQ broker configuration you can dramatically change the way
the system works and extend it to your needs without changing the client application.


Friday, November 25, 2011

Load-balanced Ordered Message Processing with Apache ActiveMQ

On my previous post (Preserving Message Order with Apache ActiveMQ) we took a look on what would be necessary to preserve message order using Apache ActiveMQ (FUSE Message Broker). We then explored on the ActiveMQ capabilities called Exclusive Consumers.

But, Exclusive Consumers bring one disadvantage that is having active consumers not doing anything (actually not consuming messages) and that may be not the desired behavior. So, let's take a look on how ActiveMQ (FUSE Message Broker) can help to avoid that situation and explore what capabilities and/or techniques are available to process messages in order when multiple consumers are active.

ActiveMQ has a feature called Message Groups which is the way to load balance multiple active consumers listening to the same queue while preserving message order. ActiveMQ will then group messages on the queue and it will guarantee that all messages of a particular group arrive in order on the same consumer.

So, to give you an example, let's say we're processing records about drivers (adding new drivers, updating drivers' information, processing speed tickets, revoking tickets, etc). You definitely don't want to process the revoke information before the ticket record because that would cause a lot of problems when the ticket doesn't exist yet and the application will try to update its information. Then, to solve that problem we could group messages by driver's license number and then let the message broker process them accordingly. Now, from the global sense the messages may not be processed in order but from the important business application sense of related messages they are delivered in the preserved order.

In the picture below, messages addressed with the same JMSXGroupID, in this case "GRP1" and "GRP2", will be pushed to a unique consumer, in other words, Consumer A will get messages that contain the JMSXGroupID equals to GRP1 and Consumer B will get messages that contain the property JMSXGroupID equals to GRP2.


In summary, ActiveMQ will correlate messages based on the property JMSXGroupsID and will deliver those to the same consumer.

On a side note, messages without a group (meaning messages with no value specified in the JMSXGroupID header property) will be distributed (load balanced) among active consumers as they would be in the normal ActiveMQ queue message processing.

But, how to implement message groups?

Very simple… the only thing you have to do is to set the JMSXGroupID property on the client producer before you send the message with whatever value you want to use for correlation. The broker itself will take care of everything else for you.

Here is a snippet of a Java client producer creating a JMS Text Message and then setting the JMSXGroupID property:

Message message = session.createTextMessage(<foo>hey</foo>);
message.setStringProperty(JMSXGroupID, Msg_group_1);


In the example above, all messages in the queue with JMSXGroupID set to Msg_group_1 will be directed exclusively to a single consumer.

How the messages reach the correct consumer then?

Well, the message broker maintains an internal hash map with the Group IDs and the consumers receiving messages for that specific group.

The consumer will then receive messages for that group until it drops the connection or a producer closes the message group by sending a message with a property called JMSXGroupSeq containing the value of -1 (minus one). That's going to be the flag telling the message broker that the group is no longer needed and the reference in the hash table can be removed.

For new message groups, the broker does a random selection of the active consumers and then start placing messages on that consumer.

So, to illustrate how to close a group, the following code shows the Java producer client closing the Msg_Group_1:

Message message = session.createTextMessage(<foo>bar</foo>);
message.setStringProperty(JMSXGroupIDMsg_group_1);
message.setIntProperty(JMSXGroupSeq-1);
producer.send(message);


Then, if another message is sent to the same message group ID, the message broker will handle that as a new message group randomly assigned to a new consumer.


Monday, November 7, 2011

LinkedIn Veterans Hackday 2011

A little different topic today but for a really good cause. I really appreciate all the effort that the military personnel has been putting together and I have heard many stories from a few and also some scary ones from the war zone which is not fun at all. That's the reality of the world we live in and while we can't (yet) stop the war, we can improve the life of the ones being part of that.

Today, I found that LinkedIn is promoting a Veterans Hackday and honestly there is nothing better than being able to use your skills to give something back to those that sacrifices their lives every day.

So, I decided to use my tech skills and hack a little project that will benefit our veterans. I honestly can't do all of that by myself and I'm counting on those from the San Diego, CA area that are available and want to work together on this over the weekend.

As I just started organizing this, I don't have an idea yet but I'd be glad to start designing something as soon as possible and then do the coding later in the week.

If you want to hack something together, please reach out and let's work together on this patriotic project...

Wednesday, October 26, 2011

JMS and Database Integration with Apache ServiceMix, Camel and ActiveMQ

I've been asked to create a simple project to demonstrate how Apache ActiveMQ, Camel and ServiceMix could be used in the same integration context. Then, for the specific customer I was talking to, I decided to create something related to the world they were used to.

This example will process messages as they are delivered on an input queue and I thought that XML would be a good format to also demonstrate how to parse the payload and generate an SQL statement  before hitting the database.

In summary, for each message going to the input queue, we're going to create a record in the database table and then generate a response message on the output queue.

I'm assuming you're already have Apache ServiceMix downloaded and installed in your machine. If not, it's time to download it… I recommend you to just go to http://fusesource.com/downloads/ and download FUSE ESB.

I'm also assuming that you already have Maven installed but if not feel free to download and install it from maven.apache.org


Here are the steps to create this short and simple demonstration:


1) Download and install MySQL database from http://dev.mysql.com/downloads/
You can use the default test database that's shipped with MySQL and the only thing you have to do is to create a table to insert test records. To do that, connect to the database  and run the following SQL statement:

CREATE table PARTNER_METRIC(partner_id int, time_occurred DATE, status_code int, perf_time long);


2) Install the following features in ServiceMix:

features:install camel-jdbc
features:install camel-jms


3) Install commons-dbcp bundle:

osgi:install -s mvn:org.apache.servicemix.bundles/org.apache.servicemix.bundles.commons-dbcp/1.2.2_6


4) When you do this you will receive a bundle id, e.g. 229.  Enable dynamic imports on this bundle so that it can pick up the appropriate database driver.

dev:dynamic-import 229


5) Using ServiceMix hot deploy feature to deploy the MySQL JDBC driver:

cp /Applications/MySQL/mysql-connector-java-5.1.18/mysql-connector-java-5.1.18-bin.jar  /Users/mjabali/Fuse/apache-servicemix-4.4.1-fuse-00-08/deploy/


Then you can verify that the driver gets deployed correctly with the following command:

karaf@root> list |grep -i mysql


and you should get a message similar to the following:

[ 227] [Active     ] [            ] [       ] [   60] Sun Microsystems' JDBC Driver for MySQL (5.1.18)


6) Download the source files of this sample and extract them on the directory of your choice. So, let's review the JMS and Database connection settings  in the following resource files:

$PROJECT_HOME/src/test/resources/sample/RiderAutoPartsPartnerTest.xml
$PROJECT_HOME/src/main/resources/META-INF/spring/beans.xml file

These are the same file albeit named differently. One is used by the bundle and the other by our test case.

We'll be also using the default Apache ActiveMQ instance for the messaging aspect of this tutorial.
To check whether the ActiveMQ is installed, up and running you can run the following command:

karaf@root> osgi:list |grep activemq-broker


and you should see an output similar to this

[  66] [Active     ] [Created     ] [       ] [   50] activemq-broker.xml (0.0.0)


You can see the default broker's definition within the activemq-broker.xml file under $SERVICEMIX_HOME/etc/activemq-broker.xml

The database source definition is on the beans.xml file and you may want to adjust it to reflect the settings on your environment. Here is a copy of the definitions I have on my machine:

<bean id="myDataSource" class="org.apache.commons.dbcp.BasicDataSource" destroy-method="close">

    <property name="driverClassName" value="com.mysql.jdbc.Driver"/>

    <property name="url" value="jdbc:mysql://localhost/test"/>

    <property name="username" value="root"/>

    <property name="password" value="XXXX"/>

</bean>

7) Let's compile the code then… Run the following command on the root directory of the project

mvn clean install -Dmaven.test.skip=true


If the code builds up successfully then you're ready to deploy on ServiceMix.

8) To deploy the bundle into ServiceMix, run the following command:

karaf@root>osgi:install mvn:com.fusesource.fusebyexample/camel-jms-dbase/1.0-SNAPSHOT


A confirmation that the bundle was deployed successfully should be returned to you and a message similar to the follow one should be displayed:

Bundle ID: 228


Then, you are ready to start the bundle and verify if has started correctly. Follow the instructions below to do that:

To start the bundle:

karaf@root>osgi:start <bundle ID>


To verify the bundle has started correctly:

karaf@root>osgi:list |grep <bundle ID>


and then a message like the following should be displayed:

[ 228] [Active     ] [            ] [Started] [   60] Camel JMS Database Example (1.0.0.SNAPSHOT)


You can also immediately turn on the trace logging capability for Camel and get additional output in the ServiceMix log facility. To enable the trace logging just run:

karaf@root>set TRACE org.apache.camel


and then to see the ServiceMix log, run:

karaf@root>log:display


You should be able to see messages with the TRACE identifier similar to the below:

11:46:17,095 | TRACE | tnerRequestQueue | JmsMessageListenerContainer      | ?                                   ? | 94 - org.springframework.jms - 3.0.5.RELEASE | Consumer [ActiveMQMessageConsumer { value=ID:titan.local-54477-1319240594120-6:1:1:1, started=true }] of session [PooledSession { ActiveMQSession {id=ID:titan.local-54477-1319240594120-6:1:1,started=true} }] did not receive a message


9) To test this sample project all you have to do is to send a sample message (there is one included in the $PROJECT_HOME/src/test/resources/sample directory) to the ActiveMQ queue that the Camel route is listening for. You can use any approach you like but writing a JMS Test client is pretty simple and there are tons of examples on the Internet and also available in the ActiveMQ sample directory. You can also use tools like HermesJMS which adds a little UI for you so you don't need to create a test program.

Either way, after sending a message to the partnerRequestQueue (default queue name used on this tutorial) you should see a couple of messages in the ServiceMix console like those below:

karaf@root>  **** toSql returning: INSERT INTO PARTNER_METRIC (partner_id, time_occurred, status_code, perf_time) VALUES ('123', '200911150815', '200', '9876')

 **** fromSql returning: Sample message to be returned on reply queue


You can verify that the values were inserted into the MySQL database running a simple query like:

select * from PARTNER_METRIC;


It is also recommended to check the ServiceMix log to make sure there are no exceptions there.

The sample code for this tutorial is available on GitHub: https://github.com/mjabali/JMS-DB-Sample

I also would like to thank my colleague Susan Javurek for putting an extra effort on this and helping out with the sample code.

UPDATE: I also would like to say a big thanks to Claus Ibsen (@davsclaus) for reminding me that all the manual steps related to OSGi bundles installation could be automated using the feature capability that consists in deploy multiple related bundles into a larger unit of deployment.

Enjoy the ride...

Wednesday, October 5, 2011

Apache ActiveMQ Enhancements to JMS

The JMS (Java Message Service) specification is very well-known for those working with messaging platforms but it has been around for quite some time and honestly not getting updates lately which gives a lot of room for enhancements and extensions.

As you can imagine Apache ActiveMQ goes beyond the JMS spec and implement lots of cool things where you can gain more in functionality, performance and scalability.

Starting from the top ConnectionFactory object, ActiveMQ has its own called ActiveMQConnectionFactory, as other JMS providers also create their own specific factories, ActiveMQ enhances the JMS with some settings that you can activate right away with little configuration and definitely see gains in performance.  Of course, when you optimize for performance, most of the time, you have the trade-off of more CPU utilization but I think CPU cycles are getting really cheap when comparing with network bandwidth and disk I/O.

Here is a list of things you can use to optimize performance extending the JMS specification with Apache ActiveMQ:

disableTimeStampsByDefault - it sets whether or not you're going to include the Time Stamp in the message header. The story behind this is that when you create a JMS message (actually when you call the send() method) we have to make a call to the system kernel to get the time stamp. This setting could save you a trip to that level and save you some time optimizing performance if the time stamp is not required in your messaging application.

copyMessageOnSend - The Java Message Service specification says that inside the send method we have to make a deep copy of the message object before sending it from the client to the broker. Setting the copyMessageOnSend property to false (default is set to true) will save you a cycle as the client won't make that copy of the message saving local resources.

useCompression - I think the property name here is self explanatory... but the ActiveMQ client will compress the message payload before it goes to the broker. So, the question is why not to use compression all the time and send smaller messages over the wire? Well, in order to compress the message payload you're going to spend CPU time and then the point is CPU vs. I/O. It's a trade-off that you may have to consider... in other words, you'll have to consider spending more CPU to compress the message or more bandwidth sending larger messages. Personally, I believe (and have seem) that if you have the chance to use compression you definitely should.

objectMessageSerializationDefered - Imagine that you're sending an Object Message and you're using an embedded broker for example (client and broker running on the same JVM). What this feature really enables you to do is that you tell the client to delay the object serialization as long as it can until it needs to hit the wire or store the message on disk. Basically, everything inside the same JVM should not be serialized as marshalling and unmarshalling objects can also be expensive.

useAsyncSend - Let's say you're sending NON_PERSISTENT messages to the broker which is equal to non-blocking call with no immediate acknowledgement and in fact it's ver fast but still not reliable messaging.
On the other hand, you can also use PERSISTENT messages which is going to be a blocking call from the client to the broker. So, one of the things you can do is to set useAsyncSend to true (default is false) and then change the behavior of PERSISTENT delivery mode to be asynchronous and no acknowledgement would be expected. In reality,  the send() method will return immediately giving you more performance because it reduces the time that the message producer waits for the message to be delivered. Keep in mind that this setting can possibly cause message loss but that's another trade-off that you have to consider when designing your messaging infrastructure.
This is a good approach if you can tolerate some message loss... typically on systems where the most updated information (last message) is always what you care about or when you have a reconciliation process in place to catch those conditions.

useRetroactiveConsumer - This feature allows you to work with limited window of memory topics where you can configure a policy to deliver let's say for example the last 10 messages sent to the topic, the last 5MB of data that went through to that topic or simply the last message sent to the topic... and all of that without the need of durable subscribers :-)
This is actually far more lightweight than using durable subscribers and it's really easy to configure and very easy to use.
Finally, since this is not JMS standard, of course, it's not set by default.

For a complete list of ActiveMQ enhancements to the JMS specification see the ActiveMQ product documentation.

I hope this helps you to push the go-faster button in your messaging infrastructure.


Monday, September 12, 2011

Using the MINA component in Apache Camel

You may find yourself trying to solve an integration problem where one of the systems doesn't "talk" anything else other than TCP/IP or UDP/IP. At that point, you may start thinking about writing your own socket server or look for one in the Internet or even create your Camel component to do that.
Well, that's where the Apache Camel MINA component comes really handy and you don't need to reinvent the wheel.

Camel MINA is a transport component working with Apache MINA which is a network application framework that provides event-driven asynchronous API over various transports such as TCP/IP and UDP.

A very common use case is to deploy camel-mina as a proxy in a Camel route and then do whatever is needed with the data like converting it to the appropriate format for example.

To give you an example, here is something you can do easily to test how camel-mina can help you:

Using the FUSE IDE create a new FUSE Project and then open the default camel-context.xml file under $PROJECT_HOME/src/main/resources/META-INF/spring if it's not open for you.

You can simply remove the default route created in the project and start with a new one.

Add a new Route. Right-click on the canvas and then select Add --> Route.

Then,  add a new Endpoint, Right-click on the canvas and then select Add --> Endpoints --> Endpoint.

Go to the Properties panel and add the following to the Uri field:

mina:tcp://localhost:8888?textline=true&sync=true

Here is a screenshot of the configuration in the FUSE IDE:


In this example, we're creating a MINA consumer endpoint that listens on port 8888, using the textline codec and sync means that we'll be using a synchronous exchange where the client can read a response from the MINA component.

To add a little more fun to this sample, you can add a simple bean to, for example, convert the payload to upper case. Really simple stuff but you get the idea as that step could be dropping that message into an ActiveMQ queue, executing another Camel component, etc.

So, here is a simple Java class to do that:

public class MyTcpMsgHandler {
public String myTcpMsgHandler(String msg){
return msg.toUpperCase();
}

}

Last development step is going to be adding the new Java bean into the route. To do that, right-click on the canvas and go to Add --> Endpoints --> Bean. Go to the Properties panel and then configure your recently create bean. Here is a sample configuration:


That's it! All the steps necessary to create your Camel route using camel-mina are there!

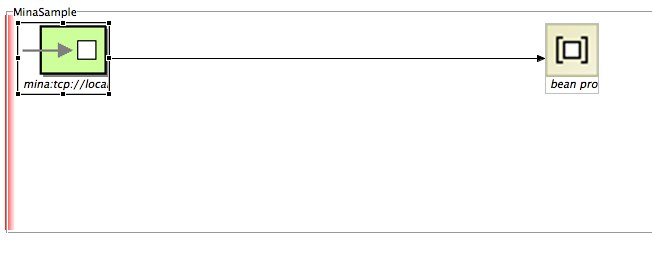
Here is a screenshot of what we just did with the complete route:


So, if you want to test that route (there are many ways to do that) you'll need a client to connect to that endpoint exposed by our route.
Here is a very simple client to test it:


package com.fusesource.fusebyexample;

import java.io.*;
import java.net.*;

class TCPClient{
 public static void main(String argv[]) throws Exception{

String sentence = null;
   String modifiedSentence;
   boolean clientUp = true;
  
BufferedReader inFromUser = new BufferedReader( new InputStreamReader(System.in));
   Socket clientSocket = new Socket("localhost", 8888);
   DataOutputStream outToServer = new DataOutputStream(clientSocket.getOutputStream());
   BufferedReader inFromServer = new BufferedReader(new InputStreamReader(clientSocket.getInputStream()));
  
while(clientUp = true){
sentence = inFromUser.readLine();
outToServer.writeBytes(sentence + '\n');
  modifiedSentence = inFromServer.readLine();
  System.out.println("FROM SERVER: " + modifiedSentence);
  if(modifiedSentence.equals("STOP")){
  clientSocket.close();
  System.out.println("Stopping TCP Client...");
    System.exit(0);
  }
}
 }
}


Don't forget to include camel-mina dependency in your POM file before you deploy your Camel route.

Next, let's test our route. Right-click on your camel-context.xml file and then select Run As... --> Local Camel Context. Watch the FUSE IDE console for any issues being reported or for a successful deployment. You can also run the Camel route manually by executing the following command:

$ mvn camel:run

Also, run the sample client which opens a prompt for you to type a message. Type for example "apache camel rocks!" and you should see a reply back like this: FROM SERVER: APACHE CAMEL ROCKS! as the result of our processing of the message by our bean.

This sample demonstration code is also available on GitHub: https://github.com/mjabali/MinaSample

Enjoy the ride!


Setting Up Local Environment for Developing Oracle Intelligent Bots Custom Components

Oh the joy of having a local development environment is priceless. For most cloud based solutions the story repeats itself being hard to tr...