While it has been an incredible ride at OpenSpan so far, I've decided to take a different route on my career and come back to the integration and messaging space. I'll be joining FuseSource as a Solutions Consultant next week.
FuseSource provides enterprise support for its open source core products, Apache ServiceMix, ActiveMQ, Camel and CXF, as well as providing products to better enable production deployment and management around those projects like the new FUSE IDE for Camel.
I'd like to take a moment to thank all the great minds at OpenSpan and wish them the best. I know that sometimes it's hard and disappointing to see someone that you trust and have lots of confidence on just go but this new opportunity in my life is well aligned with what I envision for the future.
On the other hand, I'm extremely excited to join another fast-growing company and also to be back into the integration & messaging space where most of my background is after more than 10 years working with Progress Sonic products.
There are many aspects that motivated me to make an early move and I really hope I can prove all of them to be true.
I'll be transitioning the content of this blog to more enterprise integration, open source, java and other topics and I hope you follow along.
Showing posts with label openspan. Show all posts
Showing posts with label openspan. Show all posts
Thursday, April 14, 2011
Friday, April 8, 2011
The Power of the Contextual Help
I spent this week onsite in Baltimore helping a customer architect some automation scenarios where the goal of this exercise was not only to reduce the average handling time of the contact center agents but also make them more productive and provide better customer service.
One of the issues we identified during the discovery phase of this project was the lack of ability of the users to recognize customers with flagged accounts or important alerts to need to be reviewed when get in touch with the contact center.
The current system provides a black triangle image close to the right corner of the screen while the account information is on the left corner. Ha! Don't get me wrong but who in the world designed a condition like that?
Something that has to be brought to the agent's attention in black on a gray background. Nah! It's not gonna work.
Frankly, now I understand why these agents were not able to check that alert and keep that in mind during the call or take action according to the information provided there. They couldn't see it. Agents working all day long taking calls and in front of their computers with the exact same applications all day start not recognizing small changes. It's a fact! You gotta do something better and give them a better experience if you want to have a better customer service.
So, we fixed that issue... and more than that... We didn't change a line of code on their systems.
OpenSpan has a very nice capability to recognize when a control (button, image, textbox, dropbox, etc) is created, changed, clicked or whatever happens with it.
OpenSpan also has a method called ShowToolTip which works for Windows and Web applications.
The quick solution to the issue described here was to combine these two OpenSpan capabilities.
To give you some details, when the agent was getting the account information for the call we setup an event "listening" for the alert image creation on the screen. As soon as we recognize that condition we then read the Outer HTML property of that image because that would be the text displayed on our tooltip and finally display the tooltip for 10 seconds. In a non-intrusive way we brought the agent's attention to where we needed so they could see the alert without clicking on anything and kept working on their call without any interruption.
What colors we decided to use??? Well, we decided to do it in OpenSpan Orange-like and since we were in Baltimore why not to say that was an Orioles sponsored tool tip.
It came out similar to this:

There are so many use cases for an implementation like that. From process guidance to bringing the agent's attention to certain aspects and everything in between.
If you're interested about the tooltip capability take a look on the OpenSpan Online Documentation available here.
One of the issues we identified during the discovery phase of this project was the lack of ability of the users to recognize customers with flagged accounts or important alerts to need to be reviewed when get in touch with the contact center.
The current system provides a black triangle image close to the right corner of the screen while the account information is on the left corner. Ha! Don't get me wrong but who in the world designed a condition like that?
Something that has to be brought to the agent's attention in black on a gray background. Nah! It's not gonna work.
Frankly, now I understand why these agents were not able to check that alert and keep that in mind during the call or take action according to the information provided there. They couldn't see it. Agents working all day long taking calls and in front of their computers with the exact same applications all day start not recognizing small changes. It's a fact! You gotta do something better and give them a better experience if you want to have a better customer service.
So, we fixed that issue... and more than that... We didn't change a line of code on their systems.
OpenSpan has a very nice capability to recognize when a control (button, image, textbox, dropbox, etc) is created, changed, clicked or whatever happens with it.
OpenSpan also has a method called ShowToolTip which works for Windows and Web applications.
The quick solution to the issue described here was to combine these two OpenSpan capabilities.
To give you some details, when the agent was getting the account information for the call we setup an event "listening" for the alert image creation on the screen. As soon as we recognize that condition we then read the Outer HTML property of that image because that would be the text displayed on our tooltip and finally display the tooltip for 10 seconds. In a non-intrusive way we brought the agent's attention to where we needed so they could see the alert without clicking on anything and kept working on their call without any interruption.
What colors we decided to use??? Well, we decided to do it in OpenSpan Orange-like and since we were in Baltimore why not to say that was an Orioles sponsored tool tip.
It came out similar to this:

There are so many use cases for an implementation like that. From process guidance to bringing the agent's attention to certain aspects and everything in between.
If you're interested about the tooltip capability take a look on the OpenSpan Online Documentation available here.

Thursday, March 31, 2011
How to Add Items from Comboboxes to Windows Forms
On a recent PoC (Proof-of-Concept) I had to add items from two comboboxes to a Windows Form combobox. Here is a simple solution to that:
1. Highlight the combobox control in Object Explorer and click the Explore Component Properties button at the top of the Object Explorer.

2. You should see the list of properties available for the combobox control. Select the "Items" property and then select Configure Type to see Properties and Methods of the combobox.

3. Select the Methods you would like to use and then click OK. The methods you selected will appear in the Object Explorer. I've added Items.AddRange(Object[] items) to add an Array of items Commonly used methods are:

4. Then on my Automation I just added the AddRange method to be populated by the combobox from a Windows Application. Something similar to the following:

I just did the same thing for the other combobox items I wanted to add to my Windows Form combobox and ended up with all of them in one single control.
1. Highlight the combobox control in Object Explorer and click the Explore Component Properties button at the top of the Object Explorer.

2. You should see the list of properties available for the combobox control. Select the "Items" property and then select Configure Type to see Properties and Methods of the combobox.

3. Select the Methods you would like to use and then click OK. The methods you selected will appear in the Object Explorer. I've added Items.AddRange(Object[] items) to add an Array of items Commonly used methods are:

4. Then on my Automation I just added the AddRange method to be populated by the combobox from a Windows Application. Something similar to the following:

I just did the same thing for the other combobox items I wanted to add to my Windows Form combobox and ended up with all of them in one single control.
Tuesday, March 29, 2011
How to Change the Default Drag And Drop Behavior for Properties, Methods or Events
There are some cases during a project you're constantly working with the same control and you want to change the default behavior when you drag and drop it from the Object Explorer. Well, here is what you have to do to change the default behavior in OpenSpan Studio (MS-Visual Studio plugin):
1. Select the control type you want and click Configure Type. Here is an example for a button.

2. The Button Control Configuration pops up and now you can select the property, event or method you want to be the default behavior. For the button control the "Click" event is the default behavior.

3. Select the new configuration you want to be the default behavior, right-click on it and then select Set As Default Member.

In the example above I've set the PerformClick method to be the default behavior.
The next time I drag and drop a button to the automation it will be the PerformClick method instead of the Click event.
1. Select the control type you want and click Configure Type. Here is an example for a button.

2. The Button Control Configuration pops up and now you can select the property, event or method you want to be the default behavior. For the button control the "Click" event is the default behavior.

3. Select the new configuration you want to be the default behavior, right-click on it and then select Set As Default Member.

In the example above I've set the PerformClick method to be the default behavior.
The next time I drag and drop a button to the automation it will be the PerformClick method instead of the Click event.
Tuesday, March 22, 2011
Desktop Events with OpenSpan and Oracle CEP - Part 3
Having started the Oracle CEP successfully was the goal for the second part of this tutorial. Now, we're going to start building a sample OpenSpan automation to send messages through the JMS interface we created previously and push events from the desktop application to Oracle CEP.
28. Go to OpenSpan Studio (or MS-Visual Studio with OpenSpan plug-in installed) and create a new project. Select OpenSpan Project and name it OpenSpan_OCEP_Tutorial
29. Add a new Windows Form. Add a label, text box and button to your recently created Windows Form. You should have something similar to the following picture:

30. Go to Automation1 (Add a new Automation if you don't have one) and drag a MessagePublisher component from the Toolbox (Add the component to the Toolbox if it's not available for you). Make sure it's set to Global.
31. Highlight the messagePublisher1 component and go to the Properties panel. Select the MessageVendorType and set the Message Connection Properties to connect to the Oracle WebLogic instance we configured on the Part 1 of this tutorial.

You have to provide the following information:
32. Let's initialize the messageProducer1 component when we start the project. To do that, add an OpenSpan.Runtime.RuntimeHost/ProjectStarted Event component from the Toolbox.
33. Next, add the messagePublisher1 (Start Method) to the Automation1 and then connect OpenSpan.Runtime.RuntimeHost/ProjectStarted to the messagePublisher1. You should end up with something similar to the following:

34. Add the submit button click event, the text box value and messageProducer1 (Send Method) to the Automation1 canvas. Create the message workflow connecting submit button click to the message producer. Set the text of the message connecting the text box value to the msgText variable on the message producer. Your automation should look like this:

35. Run the project, type something on the text box of the Windows form and click Publish.

36. When you click Publish on the Windows form , a JMS message is dispatched from the OpenSpan Runtime to the Oracle WebLogic JMS provider, that message is stored on the osevents_SampleQ1 queue until it's consumed by the listener on the Oracle CEP project configured on Part 2 of this tutorial. The message content is then displayed on the Oracle CEP console.

37. That message is displayed on the Oracle CEP Console because the query running against the events is simply selecting all events sent to the helloInputChannel.

The HelloWorldBean then gets the text of the message's body and print it.

Feel free to modify the query running against the events published to this Oracle CEP project or the bean printing the messages to experiment different behaviors.
This concludes the Desktop Events with OpenSpan and Oracle CEP. I hope you could follow along and this tutorial could give you a good start point to work with OpenSpan and CEP engines. Please don't hesitate to contact me if you have any questions or comments.
UPDATE: The source code of this project is available at http://dl.dropbox.com/u/10511857/OCEP_OpenSpan_Tutorial.zip
28. Go to OpenSpan Studio (or MS-Visual Studio with OpenSpan plug-in installed) and create a new project. Select OpenSpan Project and name it OpenSpan_OCEP_Tutorial
29. Add a new Windows Form. Add a label, text box and button to your recently created Windows Form. You should have something similar to the following picture:

30. Go to Automation1 (Add a new Automation if you don't have one) and drag a MessagePublisher component from the Toolbox (Add the component to the Toolbox if it's not available for you). Make sure it's set to Global.
31. Highlight the messagePublisher1 component and go to the Properties panel. Select the MessageVendorType and set the Message Connection Properties to connect to the Oracle WebLogic instance we configured on the Part 1 of this tutorial.

You have to provide the following information:
Host: localhost

Port: 7001

Connection Factory Name: osevents_queue_cf

Queue Name: osevents_SampleQ1

Queue Type: Queue

Username: (your username to Oracle WebLogic)

Password: (your password to Oracle WebLogic)

Session Mode: AUTO_ACKNOWLEDGE

Make sure you update the connection information to Oracle WebLogic if you haven't followed the tutorial and changed that information along the course of it.
32. Let's initialize the messageProducer1 component when we start the project. To do that, add an OpenSpan.Runtime.RuntimeHost/ProjectStarted Event component from the Toolbox.
33. Next, add the messagePublisher1 (Start Method) to the Automation1 and then connect OpenSpan.Runtime.RuntimeHost/ProjectStarted to the messagePublisher1. You should end up with something similar to the following:

34. Add the submit button click event, the text box value and messageProducer1 (Send Method) to the Automation1 canvas. Create the message workflow connecting submit button click to the message producer. Set the text of the message connecting the text box value to the msgText variable on the message producer. Your automation should look like this:

35. Run the project, type something on the text box of the Windows form and click Publish.

36. When you click Publish on the Windows form , a JMS message is dispatched from the OpenSpan Runtime to the Oracle WebLogic JMS provider, that message is stored on the osevents_SampleQ1 queue until it's consumed by the listener on the Oracle CEP project configured on Part 2 of this tutorial. The message content is then displayed on the Oracle CEP console.

37. That message is displayed on the Oracle CEP Console because the query running against the events is simply selecting all events sent to the helloInputChannel.

The HelloWorldBean then gets the text of the message's body and print it.

Feel free to modify the query running against the events published to this Oracle CEP project or the bean printing the messages to experiment different behaviors.
This concludes the Desktop Events with OpenSpan and Oracle CEP. I hope you could follow along and this tutorial could give you a good start point to work with OpenSpan and CEP engines. Please don't hesitate to contact me if you have any questions or comments.
UPDATE: The source code of this project is available at http://dl.dropbox.com/u/10511857/OCEP_OpenSpan_Tutorial.zip
Monday, March 21, 2011
Desktop Events with OpenSpan and Oracle CEP - Part 2
On the first part of this tutorial we walked through the steps of Oracle WebLogic JMS configuration. This is a very important step since it's the base underlying communication system between the major components for the integration between the applications part of this demonstration.
9. Assuming that everything works fine on the infrastructure side of the project you’re now ready to start developing your Oracle CEP application. Go to Oracle Enterprise Pack for Eclipse (Start Menu > Oracle WebLogic > Oracle Enterprise Pack for Eclipse).
10. Create a new Oracle CEP Application Project. Go to File > New > Other > Oracle CEP > Oracle CEP Application Project.
11. Name the project OpenSpan_Tutorial and leave all other fields as default.
12. Click Next.
13. On the New Oracle CEP Application Project select “Create an Oracle CEP Application using an application template” and choose Hello World as the template.
14. Click Finish.
15. At this point you should have an Oracle EPN similar to this:

16. Right-click at the OpenSpan_Tutorial canvas and select New… Adapter. Name it jmsAdapter.
17. Go to the config.xml file under the META-INF\wlevs\ directory and add the following configuration:
The above configuration tells the Oracle CEP application to connect to the JMS Provider configured under Oracle WebLogic.
18. Go back to the OpenSpan Tutorial EPN and remove the connection between the helloWorldAdapter adapter and the helloworldInputChannel.
19. Add a connection from the jmsAdapter to the helloworldInputChannel.

20. Right-click on the jmsAdapter component and choose Go to Assembly Source. Add the following to the helloworld-context.xml file
You’ll also need to add the following bean definition:
<bean id="eventAdapter"class="com.bea.wlevs.example.helloworld.HelloWorldBean"/>
21. Go to the HelloWorldBean java class and add the following imports:
22. Change the HelloWorldBean class to implement InboundMessageConverter. To do that, change the class signature to be:
23. Then, implement the following required method:
24. Save and close all files.
25. Your Oracle EPN should be similar to the following picture:

26. It’s time to deploy your project. Go to the Servers view. Right-click on your Oracle CEP v11.1 instance, click on Add and Remove, select the OpenSpan Tutorial and click on Add. Click Finish.
27. Your project should be deployed successfully and you should see a message similar to this on the Eclipse console:
9. Assuming that everything works fine on the infrastructure side of the project you’re now ready to start developing your Oracle CEP application. Go to Oracle Enterprise Pack for Eclipse (Start Menu > Oracle WebLogic > Oracle Enterprise Pack for Eclipse).
10. Create a new Oracle CEP Application Project. Go to File > New > Other > Oracle CEP > Oracle CEP Application Project.
11. Name the project OpenSpan_Tutorial and leave all other fields as default.
12. Click Next.
13. On the New Oracle CEP Application Project select “Create an Oracle CEP Application using an application template” and choose Hello World as the template.
14. Click Finish.
15. At this point you should have an Oracle EPN similar to this:

16. Right-click at the OpenSpan_Tutorial canvas and select New… Adapter. Name it jmsAdapter.
17. Go to the config.xml file under the META-INF\wlevs\ directory and add the following configuration:
<jms-adapter>

<name>jmsAdapter</name>

<jndi-provider-url>t3://localhost:7001</jndi-provider-url>

<destination-jndi-name>osevents_SampleQ1</destination-jndi-name>

<user>weblogic_username</user>

<password>weblogic_password</password>

<session-transacted>false</session-transacted>

</jms-adapter>
The above configuration tells the Oracle CEP application to connect to the JMS Provider configured under Oracle WebLogic.
18. Go back to the OpenSpan Tutorial EPN and remove the connection between the helloWorldAdapter adapter and the helloworldInputChannel.
19. Add a connection from the jmsAdapter to the helloworldInputChannel.

20. Right-click on the jmsAdapter component and choose Go to Assembly Source. Add the following to the helloworld-context.xml file
<wlevs:adapter id="jmsAdapter" provider="jms-inbound">

<wlevs:listener ref="helloworldInputChannel" />

<wlevs:instance-property name="converterBean" ref="eventAdapter"/>

</wlevs:adapter>
You’ll also need to add the following bean definition:
<bean id="eventAdapter"class="com.bea.wlevs.example.helloworld.HelloWorldBean"/>
21. Go to the HelloWorldBean java class and add the following imports:
import javax.jms.JMSException;

import javax.jms.Message;

import javax.jms.TextMessage;

import com.bea.wlevs.adapters.jms.api.InboundMessageConverter;

import com.bea.wlevs.adapters.jms.api.MessageConverterException;
22. Change the HelloWorldBean class to implement InboundMessageConverter. To do that, change the class signature to be:
public class HelloWorldBean implements StreamSink, InboundMessageConverter {
23. Then, implement the following required method:
public List convert(Message message) throws MessageConverterException, JMSException {

javax.jms.TextMessage textMessage = (TextMessage) message;

System.out.println("Message Processed: " + textMessage.getText());

return null;

}
24. Save and close all files.
25. Your Oracle EPN should be similar to the following picture:

26. It’s time to deploy your project. Go to the Servers view. Right-click on your Oracle CEP v11.1 instance, click on Add and Remove, select the OpenSpan Tutorial and click on Add. Click Finish.
27. Your project should be deployed successfully and you should see a message similar to this on the Eclipse console:
<Mar 18, 2011 9:43:50 PM EDT> <Notice> <Deployment> <BEA-2045000> <The application bundle "OpenSpan_Tutorial" was deployed successfully to file:/D:/Oracle/Middleware/user_projects/domains/ocep_domain/defaultserver/applications/OpenSpan_Tutorial/OpenSpan_Tutorial.jar with version 1300499030501>

<Mar 18, 2011 9:43:51 PM EDT> <Notice> <Spring> <BEA-2047000> <The application context for "OpenSpan_Tutorial" was started successfully>
Friday, March 18, 2011
Desktop Events with OpenSpan and Oracle CEP - Part 1
Oracle’s Complex Event Processing Engine can be used to monitor large volumes of real-time data feeds but how do you enable your existing applications to trigger and react with the CEP engine?
With OpenSpan Events you can quickly and easily monitor any application or set of applications on a user’s desktop - including Windows, Web, Java, mainframe, cloud-based, virtualized or Citrix-hosted applications - without modifying the original applications. All events and associated data can be sent in real-time to Oracle CEP, as well as stored in an Oracle or other central database for analysis using OpenSpan Analytics, Oracle Hyperion or any other BI or reporting tool.
Here is a step-by-step guide to get you started with OpenSpan Events with Complex Event Processing (CEP) technology. Part 1 of this tutorial is going to cover Oracle WebLogic JMS setup.
1. Download and Install Oracle WebLogic 11g R1 (http://www.oracle.com/technetwork/middleware/weblogic/downloads/index.html)
2. Download and Install Oracle Complex Event Processing 11gR1 (http://www.oracle.com/technetwork/middleware/complex-event-processing/downloads/index.html)
3. Configure Oracle CEP plugin on Eclipse Galileo shipped with Oracle WebLogic 11g R1 (http://download.oracle.com/docs/cd/E14571_01/doc.1111/e14301/ide_intro.htm#CHDGBGGA)
4. Start your Oracle WebLogic instance (Start Menu > Programs > Oracle WebLogic > User Projects > base_domain > Start Admin Server for WebLogic Server Domain). Wait for the confirmation the server is up and running. You should see a message on the log similar to the following:
<mar 18, 2011 2:58:30 PM EDT> <notice> <weblogicserver> <BEA-000360> <server started in RUNNING mode>
5. Log in to WebLogic Server 11g Administration Console pointing your web browser to http://localhost:7001/console.
6. Click on JMS Modules under Services > Messaging. By default, Oracle WebLogic creates a JMS Module called SystemModule-0. If you don’t have it, you’ll have to create one. Click on SystemModule-0.
7. You also have to create new Queues for the sample configuration where the message exchange between the desktop applications and the Oracle CEP server is going to happen. Click on New and then select Queue. Click Next and give it a name of osevents_SampleQ1. Click Finish. Repeat the process to create another Queue called osevents_SampleQ2.
You also have to create a new connection factory object that's used to create connections for JMS clients. Name your new connection factory object osevents_queue_cf with the same JNDI name.
8. To test your recently created configuration you may want to configure a few JMS clients to send and receive messages to/from these queues. I'd recommend you taking a look on the bottom of the following resource for a pretty nice and straightforward client configuration available at http://redstack.wordpress.com/2009/12/21/a-simple-jms-client-for-weblogic-11g/.
With OpenSpan Events you can quickly and easily monitor any application or set of applications on a user’s desktop - including Windows, Web, Java, mainframe, cloud-based, virtualized or Citrix-hosted applications - without modifying the original applications. All events and associated data can be sent in real-time to Oracle CEP, as well as stored in an Oracle or other central database for analysis using OpenSpan Analytics, Oracle Hyperion or any other BI or reporting tool.
Here is a step-by-step guide to get you started with OpenSpan Events with Complex Event Processing (CEP) technology. Part 1 of this tutorial is going to cover Oracle WebLogic JMS setup.
1. Download and Install Oracle WebLogic 11g R1 (http://www.oracle.com/technetwork/middleware/weblogic/downloads/index.html)
2. Download and Install Oracle Complex Event Processing 11gR1 (http://www.oracle.com/technetwork/middleware/complex-event-processing/downloads/index.html)
3. Configure Oracle CEP plugin on Eclipse Galileo shipped with Oracle WebLogic 11g R1 (http://download.oracle.com/docs/cd/E14571_01/doc.1111/e14301/ide_intro.htm#CHDGBGGA)
4. Start your Oracle WebLogic instance (Start Menu > Programs > Oracle WebLogic > User Projects > base_domain > Start Admin Server for WebLogic Server Domain). Wait for the confirmation the server is up and running. You should see a message on the log similar to the following:
<mar 18, 2011 2:58:30 PM EDT> <notice> <weblogicserver> <BEA-000360> <server started in RUNNING mode>
5. Log in to WebLogic Server 11g Administration Console pointing your web browser to http://localhost:7001/console.
6. Click on JMS Modules under Services > Messaging. By default, Oracle WebLogic creates a JMS Module called SystemModule-0. If you don’t have it, you’ll have to create one. Click on SystemModule-0.
7. You also have to create new Queues for the sample configuration where the message exchange between the desktop applications and the Oracle CEP server is going to happen. Click on New and then select Queue. Click Next and give it a name of osevents_SampleQ1. Click Finish. Repeat the process to create another Queue called osevents_SampleQ2.
You also have to create a new connection factory object that's used to create connections for JMS clients. Name your new connection factory object osevents_queue_cf with the same JNDI name.
8. To test your recently created configuration you may want to configure a few JMS clients to send and receive messages to/from these queues. I'd recommend you taking a look on the bottom of the following resource for a pretty nice and straightforward client configuration available at http://redstack.wordpress.com/2009/12/21/a-simple-jms-client-for-weblogic-11g/.
Thursday, March 17, 2011
How to Create Code-Based OpenSpan Solutions
OpenSpan Studio and its counterpart MS-Visual Studio plugin do a pretty good job when you have to integrate applications where you don’t have the source code available, service-enabled applications and/or exposed APIs. Having all the properties, events and methods graphically available make the development effort much easier than coding from scratch.
But, let’s say you’re an avid developer and feel pretty good handling code. Well, here is something you would really appreciate then. OpenSpan 4.5 has the capability of write automations directly in C#, VB or other .NET languages.
This is really powerful when you have the source code available and you want to drive your automations from a .NET-based application. Also, this approach would make the deployment sometimes simpler than the traditional approach.
Here is an example of code-based automation project:
1. Create a new .NET project. In this example we’ll be using a Visual C# project as the base project. Then, name it CodeBasedDemo.
2. You don’t the auto generated Form1.cs so feel free to remove it from your project.
3. In the same solution, create a new Empty OpenSpan project and name it CodeBasedOSDemo. Make sure you set the Solution field to Add to Solution instead of creating a new one.

4. Your solution should be similar to the following Solution Explorer image:

5. Now, it’s time to interrogate the required applications. We’re going to use a Windows-based application and a Web-based application for the purpose of the sample project. We’re not going to cover the interrogation process in details but feel free to take a look on the OpenSpan Online Help for more information. The OpenSpan Online Help is available at http://help.openspan.com/
6. After interrogating the two sample applications (MyCRM Windows-based application and the Web-based Fedex.com website) you should have something similar to the following in the Object Explorer panel:
Windows-based application

Web-based application

7. You’re now ready to dive into the code-based solution once everything we needed from the OpenSpan side is completed at this point. But before you start typing real code, make sure you import the right references to your .NET C# project. You may reference the same ones that OpenSpan automatically add when you interrogated the Windows and Web based applications.

8. Make sure you also add the CodeBasedOSDemo (the OpenSpan project) as a reference to your .NET C# project.
9. Right-click on your OpenSpan project and Build it to make all the necessary assemblies available to the parent project.
10. Open the Program.cs class file and create instances of the OpenSpan interrogated applications:

11. You’re ready to start interacting with the interrogated controls. Some of the possibilities like checking the state of checkboxes, making fields read-only, copying the required fields when the user take actions on any of the running applications, etc are listed on the commented code below:
12. Set the CodeBasedDemo project as the startup project of your solution

13. When you finish coding your automations, copy the .dll files under the CodeBasedOSDemo\bin\Debug directory to CodeBasedDemo\bin\Debug
14. Build the solution and run it.
If you have any problems building the solution take a look on the first few lines of the exception as it can point you to probably missing libraries in your project.
The sample code for this tutorial is also available here: Code-Based Demo Source
But, let’s say you’re an avid developer and feel pretty good handling code. Well, here is something you would really appreciate then. OpenSpan 4.5 has the capability of write automations directly in C#, VB or other .NET languages.
This is really powerful when you have the source code available and you want to drive your automations from a .NET-based application. Also, this approach would make the deployment sometimes simpler than the traditional approach.
Here is an example of code-based automation project:
1. Create a new .NET project. In this example we’ll be using a Visual C# project as the base project. Then, name it CodeBasedDemo.
2. You don’t the auto generated Form1.cs so feel free to remove it from your project.
3. In the same solution, create a new Empty OpenSpan project and name it CodeBasedOSDemo. Make sure you set the Solution field to Add to Solution instead of creating a new one.

4. Your solution should be similar to the following Solution Explorer image:

5. Now, it’s time to interrogate the required applications. We’re going to use a Windows-based application and a Web-based application for the purpose of the sample project. We’re not going to cover the interrogation process in details but feel free to take a look on the OpenSpan Online Help for more information. The OpenSpan Online Help is available at http://help.openspan.com/
6. After interrogating the two sample applications (MyCRM Windows-based application and the Web-based Fedex.com website) you should have something similar to the following in the Object Explorer panel:
Windows-based application

Web-based application

7. You’re now ready to dive into the code-based solution once everything we needed from the OpenSpan side is completed at this point. But before you start typing real code, make sure you import the right references to your .NET C# project. You may reference the same ones that OpenSpan automatically add when you interrogated the Windows and Web based applications.

8. Make sure you also add the CodeBasedOSDemo (the OpenSpan project) as a reference to your .NET C# project.
9. Right-click on your OpenSpan project and Build it to make all the necessary assemblies available to the parent project.
10. Open the Program.cs class file and create instances of the OpenSpan interrogated applications:

11. You’re ready to start interacting with the interrogated controls. Some of the possibilities like checking the state of checkboxes, making fields read-only, copying the required fields when the user take actions on any of the running applications, etc are listed on the commented code below:
using System;

using System.Collections.Generic;

using System.Linq;

using System.Windows.Forms;


namespace CodeBasedDemo

{

static class Program

{

//Create instances of the MyCRM and Fedex objects

static CodeBasedOSDemo.MyCRM myCRM = new CodeBasedOSDemo.MyCRM();

static CodeBasedOSDemo.Fedex fedex = new CodeBasedOSDemo.Fedex();


///

/// The main entry point for the application.

///

[STAThread]

static void Main()

{

//Start Applications

myCRM.Start();

fedex.Start();


//Make some fields Read-Only

myCRM.txttxtCreditLimit.ReadOnly = true;

myCRM.txttxtAccountBalance.ReadOnly = true;


//Handle the Do Not Call checkbox behavior

myCRM.cbDo_Not_Call.Click += new EventHandler(cbDo_Not_Call_Click);


//Handle the OK button click

myCRM.btnOK.Click += new EventHandler(btnOK_Click);

//Handle the Click on the Last Tracking Number label

myCRM.lblLast_Tracking_.Click += new EventHandler(lblLast_Tracking__Click);


Application.EnableVisualStyles();

Application.SetCompatibleTextRenderingDefault(false);

Application.Run();

}


// Close the Applications and shutdown the running instance

static void btnOK_Click(object sender, EventArgs e)

{

if(myCRM.IsRunning)

myCRM.Stop();

if(fedex.IsRunning)

fedex.Stop();

Application.Exit();

}


// Copy the Last Tracking Number from the MyCRM application

// to the text area on the Fedex website, perform the click on

// the Track button and return the Delivery Date to the Notes field

// on the MyCRM application. By the way, 3 lines of code to do that.

static void lblLast_Tracking__Click(object sender, EventArgs e)

{

fedex.textArea1.Text = myCRM.txttxtLastTrackNum.Text;

fedex.Track.PerformClick();

myCRM.txttxtNotes.Text = "Delivered Date: " + fedex.txtDeliveredDate.Text;


}


// Show or Hide the Phone field depending on the status of

// the Do Not Call checkbox

static void cbDo_Not_Call_Click(object sender, EventArgs e)

{

if (myCRM.cbDo_Not_Call.Checked)

myCRM.txttxtPhone.Hide();

else

myCRM.txttxtPhone.Show();


}

}

}
12. Set the CodeBasedDemo project as the startup project of your solution

13. When you finish coding your automations, copy the .dll files under the CodeBasedOSDemo\bin\Debug directory to CodeBasedDemo\bin\Debug
14. Build the solution and run it.
If you have any problems building the solution take a look on the first few lines of the exception as it can point you to probably missing libraries in your project.
The sample code for this tutorial is also available here: Code-Based Demo Source
Wednesday, March 16, 2011
Getting Started with OpenSpan Events (without the server infrastructure)
So, you have heard about OpenSpan and its capabilities to collect and manipulate events from the user's desktop. Well, some people have been asking me if there is any way to start playing with OpenSpan Events without building the whole infrastructure behind it. Short answer: Yes. Instead of waiting for someone to create a database, setup the tables, install OpenSpan Events Server, figure out the transport layer (HTTP/S, JMS, etc), take a look on this short tutorial to see how can you collect events locally to make sure you're getting the information you want before you hit the server...
1. Start OpenSpan Studio (Or MS-Visual Studio if you’re using the plugin)
2. Go to File > New > Project and Create a new Empty OpenSpan Project
3. Name your project “Local Events Demo” and leave all default information selected
4. You should end up with something similar to following picture:

5. Go to Project > Add New Item and select Windows Application. I’m using a sample Windows Application and I will name it MyCRM

6. Now you have to tell OpenSpan Studio where to look for that application. Go to Properties panel and select the Path to your application executable.

7. After you select the Path to the Windows Application executable, you are ready to start interrogating your application. Click on the Start Interrogation button on the application interrogation form. If you need / want more information about the OpenSpan interrogation process please take a look on the OpenSpan Online Help here or send me your questions.

8. If the interrogation process started successfully you should see your Windows application up and running. It’s now time to select the controls that you want to get events from. To do that, drag the bulls eye icon over the control you want and then release the mouse.
9. After the interrogation process you should see the controls of the Windows application (buttons, checkboxes, text fields, etc) displaying green checkmarks next to them on the Object Explorer panel. That means you have successfully interrogated that application and should be able to proceed.
Click on the Stop Interrogation button and save the project (File > Save All).

10. On the Object Explorer, click on the high level object and then go to the Properties panel. You’ll have to change two properties:
a. MonitoredEvents – That specifies which controls and events should be monitored.

Let’s select Button (Click)…

Check Box (CheckStateChanged)…

and Text Box (TextChanged, Cut, Copy and Paste).

b. MonitorEventsMode – Specifies the type of the event monitoring to perform. Set that to InterrogatedControls.

11. Go to Project menu item and then choose Add New Item again. Select Global Container and leave the default name.
12. Go to the OpenSpan Studio Toolbox and select SampleConnector from the Events section.

If the SampleConnector component is not available, you have to select Tools menu, Select Choose Toolbox Items and then select SampleConnector (HINT: you can use the Filter feature to the get faster results as you may have lots of items to add).

Click OK
Drag and Drop the SampleConnector to the Global Container 1 canvas.
13. To configure the SampleConnector, highlight it and then go to the Properties panel.
Change the values to the following:
FileDelimiter – Comma
FilePath – C:\Temp\localEvents.csv
LogFileHandling – OverwriteExistingFile
LoggingEnabled – True

14. Save the project (File > Save All).
15. Run the project. Debug menu item and then Start Debug or simply hit the green arrow on the OpenSpan Studio icons menu.
16. Click on a few buttons, change the text of text fields, copy/paste text from different text fields, mark/unmark check boxes and then stop the project.
Here is a screenshot of my Windows application:

17. Go to the location you have setup the SampleConnector to record the events file and open the localEvents.csv file. You should see something similar to the following table (I’ve cleaned up the data because OpenSpan collects all events and that could be a lot ☺ ):
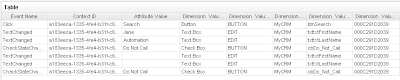
I hope this helps you to get started with OpenSpan Events...
1. Start OpenSpan Studio (Or MS-Visual Studio if you’re using the plugin)
2. Go to File > New > Project and Create a new Empty OpenSpan Project
3. Name your project “Local Events Demo” and leave all default information selected
4. You should end up with something similar to following picture:

5. Go to Project > Add New Item and select Windows Application. I’m using a sample Windows Application and I will name it MyCRM

6. Now you have to tell OpenSpan Studio where to look for that application. Go to Properties panel and select the Path to your application executable.

7. After you select the Path to the Windows Application executable, you are ready to start interrogating your application. Click on the Start Interrogation button on the application interrogation form. If you need / want more information about the OpenSpan interrogation process please take a look on the OpenSpan Online Help here or send me your questions.

8. If the interrogation process started successfully you should see your Windows application up and running. It’s now time to select the controls that you want to get events from. To do that, drag the bulls eye icon over the control you want and then release the mouse.
9. After the interrogation process you should see the controls of the Windows application (buttons, checkboxes, text fields, etc) displaying green checkmarks next to them on the Object Explorer panel. That means you have successfully interrogated that application and should be able to proceed.
Click on the Stop Interrogation button and save the project (File > Save All).

10. On the Object Explorer, click on the high level object and then go to the Properties panel. You’ll have to change two properties:
a. MonitoredEvents – That specifies which controls and events should be monitored.

Let’s select Button (Click)…

Check Box (CheckStateChanged)…

and Text Box (TextChanged, Cut, Copy and Paste).

b. MonitorEventsMode – Specifies the type of the event monitoring to perform. Set that to InterrogatedControls.

11. Go to Project menu item and then choose Add New Item again. Select Global Container and leave the default name.
12. Go to the OpenSpan Studio Toolbox and select SampleConnector from the Events section.

If the SampleConnector component is not available, you have to select Tools menu, Select Choose Toolbox Items and then select SampleConnector (HINT: you can use the Filter feature to the get faster results as you may have lots of items to add).

Click OK
Drag and Drop the SampleConnector to the Global Container 1 canvas.
13. To configure the SampleConnector, highlight it and then go to the Properties panel.
Change the values to the following:
FileDelimiter – Comma
FilePath – C:\Temp\localEvents.csv
LogFileHandling – OverwriteExistingFile
LoggingEnabled – True

14. Save the project (File > Save All).
15. Run the project. Debug menu item and then Start Debug or simply hit the green arrow on the OpenSpan Studio icons menu.
16. Click on a few buttons, change the text of text fields, copy/paste text from different text fields, mark/unmark check boxes and then stop the project.
Here is a screenshot of my Windows application:

17. Go to the location you have setup the SampleConnector to record the events file and open the localEvents.csv file. You should see something similar to the following table (I’ve cleaned up the data because OpenSpan collects all events and that could be a lot ☺ ):

I hope this helps you to get started with OpenSpan Events...
Subscribe to:
Posts (Atom)
Setting Up Local Environment for Developing Oracle Intelligent Bots Custom Components
Oh the joy of having a local development environment is priceless. For most cloud based solutions the story repeats itself being hard to tr...
-
 There are some use cases and business scenarios where you have to process messages in order. Basically, when multiple consumers receive mes...
 -
 Apache ActiveMQ / FUSE Message Broker has a feature called Virtual Destinations that are logical destinations (queues or topics) mapped t...
 -
 For several times I wondered what was the exact time my machine booted, woke up or slept. So, I did a little investigation to find out tha...